linux poison RSS
linux poison Email
2

Linux Testing and Benchmarking Package - Phoronix Test Suite

The Phoronix Test Suite is the most comprehensive testing and bench-marking platform available for Linux and is designed to carry out qualitative and quantitative benchmarks in a clean, reproducible, and easy-to-use manner. This software is based upon the internal tools and extensive Linux benchmarking work done by Phoronix since 2004, with input from tier-one computer hardware vendors. This software is open-source and licensed under the GNU GPLv3 and consists of a lightweight core (pts-core) with each benchmark consisting of an XML-based profile with related utility scripts. The process from the benchmark installation, to the actual bench marking, to the parsing of important hardware and software components is heavily automated and completely repeatable, asking users only for confirmation of actions.

The Phoronix Test Suite can be used for simply comparing your computer's performance with your friends and co-workers or can also be used at your company for internal quality assurance purposes under Linux. Results from the Phoronix Test Suite are displayed in a results viewer with optional support for uploading them to PTS Global. PTS Global allows you to browse all uploaded results, search these results (coming soon), and comparing other results against your own system.

This benchmarking software with all benchmarking profiles can be found on the downloads page. The latest development code is housed at Phorogit, the public git repository hosted by Phoronix. All support inquiries and discussions can be directed to the Phoronix Test Suite Forum.

If you're interested in getting involved with the Phoronix Test Suite as either a developer or profile/suite maintainer for your favorite software package(s) (or other software that you develop), contact phoronix [at] phoronix.com as we do welcome user contributions.
Phoronix Test Suite 1.0 is codenamed "Trondheim."


Read more
0

Reviews on openSUSE 11.0

This is a very strong OpenSUSE release with a lot of compelling improvements. OpenSUSE 11 offers the best KDE 4 experience. OpenSUSE 11 is also an increasingly solid choice for GNOME users …”

Reviews on openSUSE 11.0
You run Linux already but want to install 11.0? DVD image takes too long to download? Don’t want to waste a CD for the mini iso? A router connects you to the internet? Check out setupgrubfornfsinstall. It’s a dialog based shell script to prepare remote network installations. It was primarily made for use in LANs but now also supports direct installation from opensuse.org. Just run the script, select 11.0 and it will download the kernel and initrd used for installation. After that it adds an entry to your boot loaders’ config file with proper parameters. Reboot, select the new entry and the installation starts.

For Firefox Wallpaper : here


Read more
0

Compiz Fusion Settings in OpenSuse 11

For openSUSE 11.0, Stefan Dirsch and the rest of the openSUSE Xorg team has worked hard to ensure that AIGLX is enabled by default for all supported hardware. This means that you can run Compiz or other desktop effects such as those in KDE 4 without having to directly enable Xgl or edit xorg.conf manually. Compiz Fusion project has matured significantly, complementing Compiz with extra plugins, a new settings configuration tool, and it is now installed by default on all openSUSE 11.0 installations.

Compiz Fusion comes with a simple settings manager (Simple CCSM) which also allows you to enable and disable Compiz in both KDE and GNOME. It can be found as the Desktop Effects application in the main menu. From here you can change general settings and not have to worry about the details. You can choose from a selection of pre-configured profiles: from anything such as minimal effects, to the full-blown “Hollywood’s got Nothing” profile, giving you countless of extra effects and plugins.

Simple CCSM Simple CCSM 2
Compiz Fusion now also comes with an in-depth and highly configurable settings manager: CompizConfig Settings Manager (ccsm), which is also available by default in openSUSE 11.0. From here you can change a whole horde of settings so that Compiz behaves precisely as you want, or you can even choose to enable a large selection of extra plugins providing new eye-candy or helpful other additions. Be mindful about the performance impact that this might have on less powerful computers.
CCSM
To find out how to use this and all other plugins, simply head over the Compiz Fusion Wiki at wiki.compiz-fusion.org. For trouble-shooting and general information about Compiz Fusion on openSUSE, see the Compiz Fusion wiki page.
Read more
0

How To Create and modify ISO images

ISO Master is an open source application for Linux for creating and modifying ISO9660 files (ISO images).

Features:
Create an ISO image from scratch.
Add or remove files and directories to/from a CD image.
Create bootable CDs using various boot record types: no-emulation (isolinux, Microsoft Windows), 1.2, 1.44 and 2.88 floppy disk emulation.
Support for Rock Ridge and Joliet file names.

ISO Master can read .ISO files (ISO9660, Joliet, RockRidge, and El Torito), most .NRG files, and some single-track .MDF files; it can save only as .ISO.

Download: Here


Read more
0

Default password list in the system/Application

Why? because most system administrator forget to change their default password in the system. So basically during the first assessment or audit, just go through using this default password to enter the system. What you need is to search this following site to get default password update.

Password Generic System
This following resources provide information about detail password in many type of system

http://www.phenoelit-us.org/dpl/dpl.html
http://www.cirt.net/passwords
http://www.dopeman.org/default_passwords.html
http://www.redoracle.com/index.php?option=com_password&task=rlist
http://www.virus.org/default-password/

2. Network Devices Specific (Router, Firewall, IPS System)
http://www.routerpasswords.com/
http://www.governmentsecurity.org/

3. System Specific
Oracle Specific
http://www.petefinnigan.com/default/default_password_list.htm

SAP Specific
http://www.petefinnigan.com/default/sap_default_users.htm

Cisco Specific
http://www.cisco.com/warp/public/707/cisco-sa-20040407-username.shtml


Read more
1

Security Audit Tool for Linux (must have) - Lynis


Lynis is an auditing tool for Unix (specialists). It scans the system configuration and creates an overview of system information and security issues usable by professional auditors.

This software aims in assisting automated auditing of Unix based systems and can be used in addition to other software, like security scanners, system benchmarking and fine tuning tools.

Examples of audit tests:
- Available authentication methods
- Expired SSL certificates
- Outdated software
- User accounts without password
- Incorrect file permissions
- Firewall auditing

Supported operating systems
- CentOS 5
- Debian 4.0
- Fedora Core 4 and higher
- FreeBSD 6.x, 7.0
- Mac OS X 10.x (Tiger, Leopard)
- Mandriva 2007
- OpenBSD 4.x
- OpenSolaris
- OpenSuSE
- PcBSD
- Red Hat, RHEL 5.x
- Slackware 12.1
- Ubuntu 7.04, 7.10, 8.04

Using Lynis : Basics
To run Lynis you should meet a few requirements:
- You have to be root (log in as normal user, su to root)
or have equivalent rights (for example by using sudo).
- Have write access to /var/log (for using a log/debug and report file)
- Have write access to /tmp (temporary files)

Depending on the installation or the path you run Lynis from, you can start it with 'lynis' (if installed and the file is available in your binary path) or 'sh lynis' or './lynis'.


Read more
0

Nipper - The Network Infrastructure Parser


Nipper enables network administrators, security professionals and auditors to quickly produce reports on key network infrastructure devices.

The report can include a detailed security audit of the device settings or be a configuration report, the output is customisable. Nipper supports a wide variety of devices from different manufacturers such as Cisco, Nokia, Juniper, CheckPoint and Nortel.

Installation:
If you have GNU make, then you can make use of the Makefile provided with Nipper. The procedure is as follows:

1. Download the latest Nipper source code - here.
2. Extract the source code.
3. Change directory to the source code directory.
4. Run make
5. As a privileged user, run make install

Device Support
Nipper supports a variety of different types of device from different manufacturers. With each new version of Nipper, this support is enhanced, expanded and more device types added. The current version of Nipper supports the following different types of device:

* Bay Networks Accelar
* CheckPoint VPN-1/Firewall-1
* Cisco Catalysts (IOS, CatOS and NMP)
* Cisco Content Services Switch (CSS)
* Cisco Routers (IOS)
* Cisco Security Applicances (PIX, ASA and FWSM)
* Juniper NetScreens
* Nokia IP Firewalls
* Notel Passports
* SonicWALL SonicOS Firewalls

Reporting
Nipper supports several different report formats with a good chance that more will be added in the future. The current supported formats are:

* HTML
* XML
* Latex
* ASCII text


Read more
0

The Kernel Boot Process

The previous post explained how computers boot up right up to the point where the boot loader, after stuffing the kernel image into memory, is about to jump into the kernel entry point. This last post about booting takes a look at the guts of the kernel to see how an operating system starts life. Since I have an empirical bent I’ll link heavily to the sources for Linux kernel 2.6.25.6 at the Linux Cross Reference. The sources are very readable if you are familiar with C-like syntax; even if you miss some details you can get the gist of what’s happening. The main obstacle is the lack of context around some of the code, such as when or why it runs or the underlying features of the machine. I hope to provide a bit of that context. Due to brevity (hah!) a lot of fun stuff - like interrupts and memory - gets only a nod for now. The post ends with the highlights for the Windows boot.

At this point in the Intel x86 boot story the processor is running in real-mode, is able to address 1 MB of memory, and RAM looks like this for a modern Linux system:

RAM contents after boot loader runs
RAM contents after boot loader is done

The kernel image has been loaded to memory by the boot loader using the BIOS disk I/O services. This image is an exact copy of the file in your hard drive that contains the kernel, e.g. /boot/vmlinuz-2.6.22-14-server. The image is split into two pieces: a small part containing the real-mode kernel code is loaded below the 640K barrier; the bulk of the kernel, which runs in protected mode, is loaded after the first megabyte of memory.

Read more
5

How to run IE (Internet Explorer) in OpenSuse

IEs4Linux is the simpler way to have Microsoft Internet Explorer running on Linux (or any OS running Wine). WINE is a opensource Windows API implementation for the Linux platform and IEs4Linux is the “installer” which will download, install and get IE to work with WINE.

1. Add the WINE repository for openSUSE 11.

YaST2 -> Software -> Software Repositories.

http://download.opensuse.org/repositories/Emulators:/Wine/openSUSE_11.0/

2. Install the WINE and cabextract package.

YaST2 -> Software -> Software Management.

3. Download IEs4Linux from here or use the command line method shown below.

wget http://www.tatanka.com.br/ies4linux/downloads/ies4linux-latest.tar.gz

4. Extract and run the IEs4Linux installer. You don’t need to be root for this.

tar zxvf ies4linux-latest.tar.gz
cd ies4linux-*
./ies4linux
Read more
0

HowTo configure Dial-Up internet connection in Ubuntu

First go to System->administration ->Netwok, when a dialog appear, click Unlock, enter password.

Click Point-to-Point connection, then fill in the dialog with your dial-up internet account details, as shown.

Click OK to confirm your selection, and you are done.

Click the modem tab, put in your modem device port, typically it should be a serial device or /dev/modem

Hopefully this should be able to help you get on the internet!
Read more
0

atunes - iTunes/Winamp/Amarok killer


aTunes is a full-featured audio player and manager, developed in Java programming language, so it can be executed on different platforms: Windows, Linux and Unix-like systems, ...

Currently plays mp3, ogg, wma, wav, flac, mp4 and radio streaming, allowing users to easily edit tags, organize music and rip Audio CDs.

This media player uses the open source MPlayer engine and is built on Java, which means you can run it on pretty much any devices that supports Java. There's also a Windows installer which makes running aTunes on Windows.

Features:

* Supported formats: mp3, ogg, wma, wav, flac, mp4, ra, rm
* Online radio supported
* Player engine: mplayer
* Volume control, mute function
* Karaoke function
* Equalizer
* Shuffle and repeat options
* OSD (On-screen display)

More feature list
Download : here


Read more
0

How to install Microsoft Fonts in OpenSuse 11

Open and konsole or terminal

Now to to your home directory type “cd /home/Username/ and type the following commands to get and install Microsoft Fonts on your OpenSuse 11 box.

wget http://download.opensuse.org/update/10.3/scripts/fetchmsttfonts.sh
chmod a+x fetchmsttfonts.sh
sudo sh fetchmsttfonts.sh

Once installation is done, you may delete the file fetchmsttfonts.sh of your desktop.
Read more
53

List of best Linux blogs

There are lots of blogs in this list which are dead or non-functional, so I have created a fresh list version 2 - you can find it here 

If you got any blog which is worth mentioning here, do please let me know I will add it to the list.

Thanks
Author - Linuxpoison

UbuntuHQ Great site where you find a good collection of Ubuntu news, and posts, from other blogs.
ubuntublog Good Ubuntu blog, with lots of good Ubuntu stuff, sadly it stopped in September this year
PolishLinux This is a great Linux site, it has really good stuff, and great content
LinuxHelp Good site with great stuff, frequently updated.
UbuntuEssentials Frequently updated Ubuntu Site
Ubuntu-Unleashed Another good site with great stuff about Ubuntu Linux
HowToGeek Great How to site, not only for Linux but its Linux section is great!.
LinuxScrew good site which is coming real popular these days, with great articles.
Fsckin Frequently updated Linux site, great tutorials, and good posts about games for Linux.
ArsGeek Not only a Linux site, but with a great Linux section.
Ubuntu Geek All about Ubuntu, from a real Geek
BashCuresCancer Site devoted to command Line, unfortunately not too frequently updated
Phorolinux Really good tutorials about Linux.
http://www.linux-gamers.net/ For Linux games, how tos, forums, etc. about Video Cards, and Games.
http://www.madpenguin.org/cms/ Madpenguin, News, forums, about Linux
Ars Technica Open Ended section: http://arstechnica.com/journals/linux.ars
DesktopLinux: http://www.desktoplinux.com/
GNOME Footnotes: http://gnomedesktop.org/
Phoronix: http://www.phoronix.com/ (lots of good Linux stories)
http://www.debuntu.org Debuntu
http://tweako.com/section/ubuntu Tweako ubuntu
http://www.ubuntux.org Ubuntux
http://gaming.gwos.org Ubuntu Gamers Arena
http://freshubuntu.org/ Fresh ubuntu
http://www.markshuttleworth.com mark shuttleworth's blog
http://onlyubuntu.blogspot.com only ubuntu
http://ubuntuos.com ubuntu os
http://ubuntudemon.wordpress.com ubuntu demon
http://ubuntu.philipcasey.com ubuntu learner
http://xubuntu.wordpress.com xubuntu blog
http://www.ubustu.com/ the ubuntu feed
http://simplyubuntu.wordpress.com simply ubuntu
http://ubuntuliving.blogspot.com ubuntu living
http://allaboutubuntu.wordpress.com all about ubuntu
http://ubuntuheaven.blogspot.com ubuntu heaven
http://ubuntufan.wordpress.com ubuntu fan
http://ubuntulinux.or.id/blog/ id ubuntu blogs
http://ubuntology.com ubuntology
http://thedailyubuntu.blogspot.com/ the daily ubuntu
http://ubuntufs.wordpress.com ubuntu fs
http://ralph.n3rds.net ralph's ubuntu linux blog
http://www.ubufied.com ubufied
http://planet.gnome.org planet gnome [same as planet kde]
http://planetkde.org planet kde [links to TONS of other blogs]
http://happypenguin.org happy penguin linux gaming
http://www.nuxified.org nuxified
http://www.linuxreality.com linux reality podcasts
http://www.tuxmagazine.com tux online magazine
http://linux.byexamples.com linux by examples
http://www.fsckin.com fscking with linux
http://www.linux-watch.com linux watch
http://www.linuxtavern.com linux tavern
http://www.linuxwins.com linux wins
http://www.oreillynet.com oreilly network
http://linuxtracker.org linux tracker
http://lwn.net/ lwn
http://www.tuxme.com tuxme
http://pimpyourlinux.com pimp your linux
http://www.geekreviewed.com/ [geeky blog w/ linux category]
http://www.osdir.com os dir
http://blog.mandriva.com mandriva blog
http://kerneltrap.org kernel trap [linux kernel news]
http://www.linuxsecurity.com linux security news
http://fullcirclemagazine.org *buntu blog [3 major buntus]
http://boycottnovell.com boycottnovell
http://radio.linuxquestions.org linux questions
http://talkaboutlinux.com talk about linux
http://linuxondesktop.blogspot.com linux on desktop
http://www.jonobacon.org ubuntu/myth tv linux blog
http://kmandla.wordpress.com K.Mandla’s linux blog
http://joey.ubuntu-rocks.org/blog ubuntu rocks
http://fslog.com free software blog
http://thetuxproject.com the tux project
http://savvygeek.com savvy geek
http://bapoumba.wordpress.com a linux blog
http://linuxpoison.blogspot.com linux poison blog
http://lindesk.com
http://alinuxblog.wordpress.com

For Firefox wallpapers : here
Read more
0

How to block/allow packets sent by specific Operating System with iptables?

There is an iptables module named OSF (passive OS Fingerprinting) that was written by Evgeniy Polyakov. This module allows passively detect OS packet was sent from and perform various netfilter actions based on this match. Packets with SYN bit set are analyzed.

In order to install OSF module, do the following:

1. Download latest release from here, for example as follows:
wget http://tservice.net.ru/~s0mbre/archive/osf/osf-2008_06_14.tar.gz

2. Edit Makefile from unpacked archive in order to set proper path to iptables headers (iptables.h and libiptc/ dir).

3. If your kernel sources can not be accessed via /lib/modules/$(shell uname -r)/build, you have to replace KDIR variable with the correct path to kernel sources.
4. Run make that should build ipt_osf.ko kernel module.
5. Run make lib that will build libipt_osf.so shared library (copy it to where all other iptables shared libs are placed in your distro e.g. /lib/iptables or /lib64/iptables in Fedora).

6. Run make bin that will build userspace applications which allows to load fingerprints and obtain information about matched packets (load, osfd, ucon_osf).

7. Download signatures list:
wget http://www.openbsd.org/cgi-bin/cvsweb/src/etc/pf.os

8. Install kernel module:
insmod ./ipt_osf.ko

9. Load signatures:
./load ./pf.os /proc/sys/net/ipv4/osf

10. Set up iptables rules allowing/disallowing packets generated by certain OS:
iptables -I INPUT -j ACCEPT -p tcp -m osf --genre Linux --log 0 --ttl 2
This example allows traffic from Linux systems and logs packets from other ones:
ipt_osf: Windows [2000:SP3:Windows XP Pro SP1, 2000 SP3]: 11.22.33.55:4024 -> 11.22.33.44:139

BTW, OSF has following options:

* --log
If present, OSF will log determined genres even if they don't match desired one.
0 - log all matched and unknown entries.
1 - only first one.
2 - log all matched entries.
* --ttl
0 - true ip and fingerprint TTL comparison. Works for LAN.
1 - check if ip TTL is less than fingerprint one. Works for global addresses.
2 - do not compare TTL at all. Allows to detect NMAP, but can produce false results.
* --connector
If present, OSF will log all events also through netlink connector(1.0 id).
More about connector can be found in Documentation/connector in kernel source tree.


Read more
1

Domain Masquerading in Sendmail

Suppose you have a domain (test.com) on which your sendmail is running and you want to send out the mails from this server with domain (other.com) — (This is a very simple example to doing spamming)

In such a scenario, sendmail can be configured to masquerade the domain name (From test.com to other.com), effectively.

Before changing the default sendmail configuration, the Sendmail Configuration Files and the M4 macro processor must be installed. M4 reads the sendmail.mc file and produces the sendmail.cf configuration file read by the sendmail application.

Next, we need to modify the sendmail.mc file, located in /etc/mail. We’re mainly concerned with the MASQUERADE_AS, masquerade_envelope and masquerade_entire_domain lines. These lines will be prefixed with delete through newline (dnl) statements. Delete dnl from the beginning of

dnl MASQUERADE_AS(`other.com’)
dnl, FEATURE(masquerade_envelope)
dnl and FEATURE(masquerade_entire_domain)

Change the MASQUERADE_AS line to reflect the domain name (other.com) that the from address should display (domain of outgoing mail).

Now any user which send the mail with address username@test.com will have username@other.com as a display name going out from this sendmail.
Read more
0

Check you Disk speed

Using some simple command you can check the performance of you hard disk, just execute following command…

# hdparm -tT /dev/hda

/dev/hda:
Timing cached reads: 732 MB in 2.00 seconds = 365.20 MB/sec
Timing buffered disk reads: 114 MB in 3.05 seconds = 37.38 MB/sec

Substitute /dev/hda with the name of your disk device.
Read more
0

How To do a quick Network Performance Test

If you want to do a simple and quick network performance test you can use the ftp command.

FTP on Linux and other Unix systems allows you to pass shell commands to the ftp client by using the pipe symbol ‘|’ as the first character of the file name. With this feature you can send a very large file to a remote host using /dev/zero as input and /dev/null as output.

Example:

ftp> put “|dd if=/dev/zero bs=1M count=100″ /dev/null

This command transfers a large file without involving the disk and without having to cache the file in memory. If you use a large file on a disk it might become a bottleneck. In this example, “|dd if=/dev/zero bs=1M count=100″ becomes the input file. Since a dd command without the “of=” paramater prints the content of the file to standard output (stdout), the ftp client can read the output and pass it on to the remote file which is /dev/null on the remote host.
Read more
15

Multimedia support in OpenSuse 11 (MP3, MPEG-4, DiVX, etc.)

If you are using KDE - Download and run (execute) this
If you are using Gnome - Download and execute this

Want VLC player - Download and run this

This will enable you to have:
Flash
Java
Latest Amarok (with MP3 Support) for KDE, or Helix-Banshee for GNOME users
Encrypted DVD (libdvdcss)
Extra XINE Codecs, for DivX/Xvid etc. (libxine1)
K3b with MP3 Support (k3b-codecs)
Win 32 Codecs (w32codec-all)

Read more
0

Things that will not work in OpenSuse 11.0

Xgl Versus AIGLX

On openSUSE 11.0 it is no longer possible to enable or disable Xgl with a graphical tool (such as gnome-xgl-settings in the past). Only the command line tool xgl-switch is still left to do this job. Instead AIGLX is now always enabled on supported hardware. There are still some issues with AIGLX (e.g., Xvideo is usually slower, OpenGL applications are misplaced when you rotate compiz' cube), but the majority of our customers are requesting to have AIGLX enabled by default. If you prefer Xgl over AIGLX use the command line tool xgl-switch to enable it:

xgl-switch --enable-xgl

If there are problems after enabling it (Xserver crashes, etc.) disable it again by running

xgl-switch --disable-xgl

The proprietary NVIDIA driver needs neither AIGLX nor Xgl for running with compositing managers as it provides its own framework. To enable Compiz, use "Desktop Effects (simple-ccsm)" application from the application menu.

Inode Size on the Ext3 Filesystem Increased

The inode size on the ext3 filesystem is increased from 128 to 256 by default. This change breaks many existing ext3 tools such as the windows tool EXTFS. If you depend on such tools, install openSUSE with the old value.

Press Ctrl-Alt-Backspace Twice to Terminate the X Server

Pressing Ctrl-Alt-Backspace on GNOME, KDE, or any other graphical desktop does not terminate the X server any longer. If you press Ctrl-Alt-Backspace within 2 seconds again, it terminates the X server. On most hardware you hear a beep after the first Ctrl-Alt-Backspace press.
Read more
0

Check errors in NIC from command line

Errors are a common symptom of slow connectivity due to poor configuration or excessive bandwidth utilization. They should always be corrected whenever possible. Error rates in excess of 0.5% can result in noticeable sluggishness.

Ifconfig Error Output

wlan0 Link encap:Ethernet HWaddr 00:06:25:09:6A:D7
BROADCAST MULTICAST MTU:1500 Metric:1
RX packets:2924 errors:0 dropped:0 overruns:0 frame:0
TX packets:2287 errors:0 dropped:0 overruns:0 carrier:0
collisions:0 txqueuelen:100
RX bytes:180948 (176.7 Kb) TX bytes:166377 (162.4 Kb)
Interrupt:10 Memory:c88b5000-c88b6000

ethtool Error Output
The ethtool command can provide a much more detailed report when used with the -S switch.

[root@poison root]# ethtool -S eth0
NIC statistics:
rx_packets: 1669993
tx_packets: 627631
rx_bytes: 361714034
tx_bytes: 88228145
rx_errors: 0
tx_errors: 0
rx_dropped: 0
tx_dropped: 0
multicast: 0
collisions: 0
rx_length_errors: 0
rx_over_errors: 0
rx_crc_errors: 0
rx_frame_errors: 0
rx_fifo_errors: 0
rx_missed_errors: 0
tx_aborted_errors: 0
tx_carrier_errors: 0
tx_fifo_errors: 0
tx_heartbeat_errors: 0
tx_window_errors: 0
tx_deferred: 0
tx_single_collisions: 0
tx_multi_collisions: 0
tx_flow_control_pause: 0
rx_flow_control_pause: 0
rx_flow_control_unsupported: 0
tx_tco_packets: 0
rx_tco_packets: 0

Take a close look at errors sections in the above output
Read more
3

Squid Password Authentication Using NCSA

You can configure Squid to prompt users for a username and password. Squid comes with a program called ncsa_auth that reads any NCSA-compliant encrypted password file.

1) Create the password file. The name of the password file should be /etc/squid/squid_passwd, and you need to make sure that it’s universally readable.

# touch /etc/squid/squid_passwd
# chmod o+r /etc/squid/squid_passwd

2) Use the htpasswd program to add users to the password file. You can add users at anytime without having to restart Squid. In this case, you add a username called nikesh:

# htpasswd /etc/squid/squid_passwd nikeshNew
password:Re-type new password:
Adding password for user nikesh

3) Find your ncsa_auth file using the locate/find command. (different distro stores this file at different locations)

# locate ncsa_auth/usr/lib/squid/ncsa_auth

4) Edit squid.conf; specifically, you need to define the authentication program in squid.conf, which is in this case ncsa_auth. Next, create an ACL named ncsa_users with the REQUIRED keyword that forces Squid to use the NCSA auth_param method you defined previously. Finally, create an http_access entry that allows traffic that matches the ncsa_users ACL entry. Here’s a simple user authentication example; the order of the statements is important:

## Add this to the auth_param section of squid.conf

auth_param basic program /usr/lib/squid/ncsa_auth /etc/squid/squid_passwd

# Add this to the bottom of the ACL section of squid.conf
acl ncsa_users proxy_auth REQUIRED

# Add this at the top of the http_access section of squid.conf
http_access allow ncsa_users

Remember to restart Squid for the changes to take effect.
Read more
0

Its time to upgrade from OpenSuse 10.x to OpenSuse 11.0

We hear that openSUSE 11.0 is just about to come out in some hours time, and it's high time to consider to go from a .2/.3 release to a .0 release? Well here are some main reasons why:

QT4 Installer:
Obviously the first thing you see when you upgrade / install an operating system is the installer screen. openSUSE 11.0 introduces a beautifully designed new QT 4 installer, that runs circles around any current Windows / Linux or Mac OX Installer (in terms of looks).

Package Management (Zypper):
Zypper has gone through MANY changes since it’s time in openSUSE 10.3. Currently 11.0 is running zypper 0.11.6-4.1, and package management is done so much smarter and faster (installing application, updating repo’s everything is much faster on openSUSE 11.0 then it was in previous versions).

Xorg:
Xorg has been updated to 7.3 (upgraded from 7.2 in openSUSE 10.3) and has many updates to Intel / Nvidia based xorg drivers. (if running Nvidia / ATI I recommend installing ATI / Nvidia proprietary drivers). Also note that AIGLX is enabled by default now.

Kernel:
openSUSE 11.0 ships with the pae kernel by default and is version 2.6.25 which has seen many improvements in virtualization, scheduling and obviously hardware support since 10.3’s release with 2.6.22.

KDE 3.5.9:
Has many improvements from KDE 3.5.7 which shipped with openSUSE 10.3. Many enhancements were done to PIM (Personal Identification Manager, ie Kmail, Kontact etc) along with many bugfixes since then.

KDE 4:
Although KDE 4.1 wasn’t released in time for openSUSE 11.0 you can upgrade to it using one of the openSUSE Build Services. With that said, openSUSE 11.0 ships with KDE 4.0.4 and will stay with that line for the life of the product. I honestly think it is on its way to being a very kick ass Desktop Environment, BUT, I just cannot afford to use it as my default DE on my production machines, since there are still some issues (mostly in plasma).

GNOME 2.22:
Pretty much enough said on that. GNOME 2.22 had many many improvements in everypart of GNOME, which can be found here:
http://library.gnome.org/misc/release-notes/2.22/

There are tons of other reasons and updates that have been done, that I haven’t captured in this quick blog. This is just to help steer the people on the grasps of “Should I upgrade or not” to just go ahead and do it. Many of the other notable updates are:

NetworkManager (although it still has a few issues with communication with YaST configurations)
OpenOffice (2.4.1).
Wine (1.0 rc by default but with the release of 1.0 today, I expect it to make the update repo).
Amarok (1.4.9.1)

If you feel I’ve missed something important please let me know and i’ll add.

The most important things though:
If you find a bug report it http://bugzilla.novell.com
This will help openSUSE mature more, and make 11.x be a great long lasting distribution.


Read more
3

GRE Tunneling How to

Lets say you have 2 networks that you want to connect to each other. These networks are both connected to the Internet.

So we have network A:

network 10.0.1.0
netmask 255.255.255.0
router 10.0.1.1
Internet 172.16.17.18

and network B:

network 10.0.2.0
netmask 255.255.255.0
router 10.0.2.1
Internet 172.19.20.21

On the router of network A, you do the following:

ip tunnel add B mode gre remote 172.19.20.21 local 172.16.17.18 ttl 255
ip addr add 10.0.1.1 dev B
ip link set B up
ip link set B mtu 1514
ip route add 10.0.2.0/24 dev B

let’s go on with the router of the network B

ip tunnel add A mode gre remote 172.16.17.18 local 172.19.20.21 ttl 255
ip addr add 10.0.2.1 dev A
ip link set A up
ip link set A mtu 1514
ip route add 10.0.1.0/24 dev A

If you want to delete the tunnel.

ip link set B down
ip tunnel del B

Of course, you can replace B with A for the A router
Read more
0

Block Messenger (AOL, Yahoo, MSN) services through Squid and Iptables

First of all you need to have a running copy of squid and you make transparent for your local
LAN. Add this to your squid.conf:

httpd_accel_host virtual
httpd_accel_port 80
httpd_accel_with_proxy on
httpd_accel_uses_host_header on

And this to your IPTABLES:

iptables -t nat -A PREROUTING -i eth1 -p tcp –dport 80 -j REDIRECT –to-port 3128
iptables -A OUTPUT -j ACCEPT -m state –state NEW,ESTABLISHED,RELATED
-o eth0 -p tcp –dport 80

…where eth0 is your external interface and eth1 your internal.

To block AOL IM and ICQ:
# iptables -A FORWARD –dport 5190 -j DROP
# iptables -A FORWARD -d login.oscar.aol.com -j DROP

To block MSN messenger:
# iptables -A FORWARD -p TCP –dport 1863 -j DROP
# iptables -A FORWARD -d 64.4.13.0/24 -j DROP

Kaaza Blocking
iptables -t nat -A POSTROUTING -s 150.100.16.0/255.255.240.0 -d ! 150.100.16.0/255.255.240.0 –dport 1214 –j DROP

Add following in squid.conf file

# Yahoo Messenger service
acl Yahoo-Mess dst 24.71.200.68/32 204.71.202.73/32 204.71.200.0/24
204.71.177.35/32 204.71.202.59/32 204.71.202.58/32 216.115.105.214/32
204.71.201.47/32 204.71.201.48/32 216.115.105.215/32
216.136.172.221/32 *.msg.yahoo.com
http_access deny Yahoo-Mess

# Trillian service
acl Trillian-Mess dst 66.216.70.167/32
http_access deny Trillian-Mess
Read more
5

How to create a self signed certificates for Java Applets

1. Create your code for the applet as usual.

2. Install JDK and set the class-path/path

3. Generate key: keytool -genkey -keyalg rsa -alias key

Enter keystore password:
What is your first and last name?
[Unknown]: Nikesh
What is the name of your organizational unit?
[Unknown]: Cybage
What is the name of your organization?
[Unknown]: Cybage
What is the name of your City or Locality?
[Unknown]: Pune
What is the name of your State or Province?
[Unknown]: MH
What is the two-letter country code for this unit?
[Unknown]: IN
Is CN=Nikesh, OU=Cybage, O=Cybage, L=Pune, ST=MH, C=IN correct?
[no]: yes

(wait...)

Enter key password for
(RETURN if same as keystore password):
Re-enter new password:

(press [enter])

4. Export key: keytool -export -alias key -file cert.crt

Enter keystore password: *******
Certificate stored in file cert.crt

5. Create JAR: jar cvf applet.jar main.class
Add all classes used in your project by typing the classnames in the same line.

added manifest
adding: main.class(in = 671) (out= 460)(deflated 31%)

6. Verify JAR: jar tvf applet.jar

0 Fri Jun 20 17:51:38 IST 2008 META-INF/
68 Fri Jun 20 17:51:38 IST 2008 META-INF/MANIFEST.MF
671 Wed Jun 18 11:48:34 IST 2008 main.class

7. Sign JAR: jarsigner applet.jar key
Enter Passphrase for keystore:******

Warning:
The signer certificate will expire within six months.

8. Verifiy Signing: jarsigner -verify -verbose -certs applet.jar


131 Fri Jun 20 17:53:04 IST 2008 META-INF/MANIFEST.MF
252 Fri Jun 20 17:53:04 IST 2008 META-INF/KEY.SF
889 Fri Jun 20 17:53:04 IST 2008 META-INF/KEY.RSA
0 Fri Jun 20 17:51:38 IST 2008 META-INF/
smk 671 Wed Jun 18 11:48:34 IST 2008 main.class

X.509, CN=Nikesh, OU=Cybage, O=Cybage, L=Pune, ST=MH, C=IN (key)
[certificate will expire on 9/18/08 5:47 PM]


s = signature was verified
m = entry is listed in manifest
k = at least one certificate was found in keystore
i = at least one certificate was found in identity scope

jar verified.

Warning:
This jar contains entries whose signer certificate will expire within six months.

9. Create HTML-File for use of the Applet
Read more
0

Few Quick How To’s for Fedora

How to list partition tables
fdisk -l

How to list filesystem disk space usage
df -T -h

How to list mounted devices
mount

How to list PCI devices

lspci or /sbin/lspci
If the first does not work try the latter.

How to list USB devices
lsusb

How to forcefully unmount CD/DVD-ROM manually
umount /media/cdrom0/ -l

How to remount /etc/fstab without rebooting
mount -a

How to generate MD5 checksum files
md5sum file.iso > file.iso.md5

How to check MD5 checksum of files
e.g. Assumed that file.iso and file.iso.md5 are in the same folder
md5sum -c file.iso.md5

How to mount/unmount Image (ISO) files without burning
mkdir /media/iso
modprobe loop
mount file.iso /media/iso/ -t iso9660 -o loop
umount /media/iso/

How to change computer name
hostname your_new_computer_name

How to access network folders without mounting
e.g. Assumed that network connections have been configured properly
Network computer’s IP: 192.168.0.1
Shared folder’s name: linux
smb://192.168.0.1/linux

How to connect into remote Fedora desktop
e.g. Assumed that remote Fedora machine have configured Remote Desktop
Remote Fedora machine: 192.168.0.1
vncviewer -fullscreen 192.168.0.1:0

How to install support for NTFS
yum -y install kernel-module-ntfs-$(uname -r)

How to disable history listing in Console mode
rm -f $HOME/.bash_history
touch $HOME/.bash_history
chmod 000 $HOME/.bash_history

How to use Fedora Installation CD, to gain root user access
Insert Fedora CD #1 into your CD-ROM and boot from it
linux rescue

How to restart GNOME/KDE without rebooting computer
Press ‘Ctrl + Alt + Backspace’

How to switch to Console mode in GNOME/KDE
Press ‘Ctrl + Alt + F1′ (F2 - F6)
To switch back to GNOME/KDE modePress ‘Alt + F7′

How to install/uninstall .rpm files
To install .rpm filerpm -i package_file.rpm
To uninstall .rpm filerpm -e package_name

How to set System-wide Environment Variables
cp /etc/bash.bashrc /etc/bash.bashrc_backupg
edit /etc/bash.bashrc
Append the System-wide Environment Variables at the end of file and save.

How to save “man” outputs into files
man command | col -b > file.txt

How to convert Wallpaper to Splash Image for GRUB menu
convert -resize 640×480 -colors 14 wallpaper.png
splashimage.xpm && gzip splashimage.xpm
Read more
2

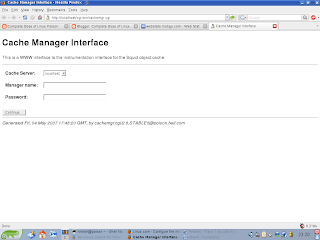
cachemgr (Cache Manager) configuration for Squid

The cache manager (cachemgr.cgi) is a CGI utility comes with squid for displaying statistics about the squid process as it runs. The cache manager is a convenient way to manage the cache and view statistics without logging into the server

To make this configuration you need a webserver (Apache) running and configured.

1) Try to locate your cachemgr.cgi file which comes with the squid package, this can be done using rpm -ql command (different distro stores this file at different location), here you can also use locate/find command.

# rpm -ql squid | grep cachemgr.cgi
/usr/share/doc/packages/squid/scripts/cachemgr.cgi
/usr/share/man/man8/cachemgr.cgi.8.gz

In this case my cachemgr.cgi is in /usr/share/doc/packages/squid/scripts/ directory

2) Copy cachemgr.cgi file to your configure script alias (/var/www/cgi-bin) directory of you Apache

3) Open squid.conf file and insert following two parameters at the end of the file

cache_mgr nikesh@domain.com
cachemgr_passwd your_Password all

4) Restart your squid and open your browser and type
http://localhost/cgi-bin/cachemgr.cgi
you should see something like … , provide a configure e-mail and password (mentioned above)


Read more
0

Couple of easy steps to Speed Up Linux

By default there are lot of services that are running on your system (Any Fedora system) and all these services consume your resource like CPU and Memory, increase your booting time and also open your system for attack, So in order to make your system run faster and safer we need to stop all these unwanted services.

Login with root account, go to console and fire command “ntsysv”, you should see something similar to this…Now stop all the unwanted services and restart your box, you should see some decrease in your booting time.

Note: If your not aware of what all these services means, please do some google or use command “system-config-services” which provides a good looking GUI interface and also provide some short description about all these services.

For suse use - They can use "yast2" to lookup the services.

2) Need to get more out of your linux
As per man pages of “mount” command, we have some good option to speed up the access of files from your HDD … “noatime option do not update inode access times on file system (e.g, for faster access on the news spool to speed up news servers)”So if we update the our fstab file and mount our root partition (/) with “noatime” will surely increase the speed of our box, (This is how you can do this - have similar entry for your “/” partition in your fstab file)

LABEL=/ / ext3 defaults,noatime 1 1
Read more
0

What is TTL - "Time To Live"

Have you ever observed the output of ping command … and wonder what’s this “TTL” stand for

Pinging www.google.com [72.14.205.104] with 32 bytes of data:

Reply from 72.14.205.104: bytes=32 time=365ms TTL=242
Reply from 72.14.205.104: bytes=32 time=367ms TTL=242
Reply from 72.14.205.104: bytes=32 time=370ms TTL=242
Reply from 72.14.205.104: bytes=32 time=366ms TTL=242

Each IP packet has a Time to Live (TTL) section that keeps track of the number of network devices the packet has passed through to reach its destination. The server sending the packet sets the initial TTL value, and each network device that the packet passes through then reduces this value by 1. If the TTL value reaches 0, the next network device will discard the packet.

This mechanism helps to ensure that bad routing on the Internet won’t cause packets to aimlessly loop around the network without being removed. TTLs therefore help to reduce the clogging of data circuits with unnecessary traffic.
Read more
0

Execute a task ‘at’ the time you want

Procedure :

At the prompt type this command followed by

$ at 2359

The moment you press Enter the prompt changes into an arrow indicating that more information is required by Linux. Type the following command assuming you have installed XMMS player which plays mp3 files and that you actually have a mp3 file in the directory shown below

> xmms /home/david/mp3s/rock_my_world.mp3

Once you have typed the above press and then finally press -D

Thats it. Now Linux will make the XMMS player to play the particular mp3 file at the time 23:59. Thats just a minute before midnight. Linux surely rocks your world !! ;-)

Basically if you are using the 24 hour clock then you enter the time you want with the hours and the minutes together one after another. Hours = 0-23 & Minutes = 0-59. Then type the exact command that you would have typed had you wanted to execute the task manually. If you want you can issue more commands after the first one. Once you finish entering all the tasks press -D to indicate that you have finished. Then wait and enjoy.. Linux will do the rest.
Read more
7

Monitor your hardware Temperature - Ubuntu

Monitor your hardware Temperature - Ubuntu
Computer Temperature Monitor is a little applet for the GNOME desktop that shows the temperature of your computer CPU and disks on screen. It allows you to log temperatures to a file. You can set alarms to notify you when a tempertature is reached.

Download (ubuntu): Here
Download (Source): Here

Configuration on Ubuntu:


Read more
1

HowTo solve the problem of apache/sendmail hangs During Startup

If you are having trouble with the Apache-based httpd service or Sendmail hanging at startup, make sure the following line is in the /etc/hosts file:

127.0.0.1  localhost.localdomain  localhost
Read more
0

Limit users access to a time range

In the cases when you want to limit the access to a Linux operating system in a time range, you would like to use pam_time.so.

Take a look at /etc/security/time.conf

To limit for example ssh access from 23:00 PM and 08:00 AM.
sshd;*;*;!Al2300-0800

The format of the file is:
Service;ttys;users;time

the !Al means, anything except "All the days".

If you would like to permit people from 4 to 8 PM all the days, except root:
login;*;!root;!Al1600-2000

Further reading: man time.conf
Read more
0

HowTo do X11 Forwarding over an SSH connection

Starting an X11 session over an SSH connection is as easy as connecting to the SSH server, we just need to use the -Y option and running an X program on a local machine.

ssh -Y @example.com

When an X program is run from the secure shell prompt, the SSH client and server create a new secure channel, and the X program data is sent over that channel to the client machine transparently.
Read more
0

What is Challenge Handshake Authentication Protocol (CHAP)

Approaches to authentication such username and password is done only once, at the point that the user logs into the system. An alternative to this approach is provided by the Challenge Handshake Authentication Protocol (CHAP) which repeats an authentication procedure at random intervals during an ongoing connection between a client and a service.

The CHAP authentication scheme is used primarily by Point to Point Protocol (PPP) servers as a way to validate the identity of remote clients (perhaps most commonly used by internet service providers). At random time intervals, CHAP verifies the identity of the client by using something known as a three-way handshake. This verification is performed using a credential which is known to both the client and the service (typically the user's password).

After the link between the client and the server (also known as the authenticator) has been established it sends a challenge message to the peer. The peer subsequently responds to the authenticator with a hashed value calculated using the Message Digest (MD5) hashing algorithm. The authenticator checks the client response against its own calculation of the expected hash value. If the two values match, the authenticator acknowledges the authentication. If the values do not match, the connect is terminated. These steps are repeated at random intervals.

It is important to note that Microsoft has also implemented two variants of the Challenge Handshake Authentication Protocol, called MS-CHAP and MS-CHAP-v2.
Read more
0

World's fastest supercomputer runs RedHat Linux

IBM announced the completion of a one-petaflop supercomputer that runs Red Hat Linux. Twice as fast as the previous record-setter, the IBM Blue Gene, the Roadrunner uses a hybrid design that combines 6,948 dual-core AMD Opteron chips with 12,960 Cell processor engines.

The Roadrunner was built for the Department of Energy's National Nuclear Security Administration and will be soon be shipped to its new home at Los Alamos National Laboratory in New Mexico. There, it will be put to work monitoring the nation's nuclear weapons stockpile, but will also be available for research into astronomy, energy, human genome science, and climate change, says IBM.

Like Blue Gene and some 75 percent of the world's supercomputers, the $100 million Roadrunner runs Linux. As with most of them, the new world record-holder runs multiple instances of Linux over a cluster of interconnected computers.

More
Read more
0

How To install RMP packages in Ubuntu

There's a utility called Alien that converts packages from one format to the other. This doesn't always mean that an rpm will work on your system, though. You will need to install some prerequisite software packages in order to install alien

Run this command to install alien and other necessary packages:

sudo apt-get install alien dpkg-dev debhelper build-essential

To convert a package from rpm to debian format, use this command syntax. The sudo may not be necessary, but we'll include it just in case.

sudo alien packagename.rpm

To install the package, you'll use the dpkg utility, which is the internal package management tool behind debian and Ubuntu.

sudo dpkg -i packagename.deb

The package should now be installed, providing it's compatible with your system.

Thanks to : http://www.howtogeek.com
Read more
0

Reinstall Ubuntu Grub Bootloader

1) Boot with the LiveCD

2) Open a Terminal and type in the following commands, note that hd0,0 implies the first hard drive and the first partition on that drive, which is where you probably installed grub to during installation. If not, then adjust accordingly.

sudo grub
> root (hd0,0)
> setup (hd0)
> exit

Reboot (removing the livecd), and your boot menu should be back.
Read more
0

Installing Fedora from the hard drive (without a boot CD).

Download the DVD ISO :
Get the Fedora Core DVD iso from http://fedoraproject.org/en/get-fedora and save the disk image to a partition on your hard drive that will not be formatted during the installation.

If you have a FAT32 partition that you use to share data with Windows on a dual boot system like mine then this is an ideal place. Otherwise any Linux partition (ext2, ext3) will do as long as it can be read by the installation program (for this reason an NTFS formatted windows partition will not work).

Also make sure that the partition is large enough to hold the file as the Fedora DVD weights in around 3+ Gb.

Mount the downloaded iso file
Next we need to mount the iso so we can read the contents, open a terminal and as root run the following command. The iso can be mounted anywhere but in my case I'll create a folder in my home directory and mount it there.

$ mkdir ~/FedoraInstall
$ mount -o loop -t iso9660 /mnt/fat/dualboot/F-9-i386-DVD.iso FedoraInstall/

Replace /mnt/fat/dualboot/F-9-i386-DVD.iso with the location of your saved DVD iso file and FedoraInstall with your desired mount point. Now you should be able to browse the contents of the install iso from the command line or Nautilus.

Copy the boot files
Next go into the newly created mounted files and find the directory called isolinux, From the command line do the following.

$ cd ~/FedoraInstall/isolinux/
$ ls
boot.cat initrd.img memtest rescue.msg vmlinuz
boot.msg isolinux.bin options.msg splash.lss
general.msg isolinux.cfg param.msg TRANS.TBL

Copy the files called initrd.img and vmlinuz to your /boot directory (you will need to be root to write files to the boot directory)

$ cp initrd.img vmlinuz /boot/

If you wish to rename these files to make them easier to identify in the future that's OK as long as you know what they are called for the next step. I'll rename them with the name -installFC8, again root login is required.

$ cd /boot/
$ mv initrd.img initrd-installFC8.img
$ mv vmlinuz vmlinuz-installFC8

Edit your grub.conf
Finally we need to add an entry to our grub.conf file to give us the option of booting into the installer and to tell grub where to find the boot files we just copied. Open the file /etc/grub.conf with a text editor (as root) and add the following lines.

title Fedora 9 install
root (hd0,2)
kernel /vmlinuz-install ro
initrd /initrd-install.img

The title is up to you but be sure to replace the root (hd0,2) with the correct information from your system. The easiest way is just to copy the entry from your other grub entries. In my case I also have:

title Fedora (2.6.24.1-41.fc8)
root (hd0,2)
kernel /vmlinuz-2.6.22.1-41.fc8 ro root=/dev/VolGroup00/LogVol00 quiet vga=834

So just use the value from your other boot target. Also if you renamed the initrd.img and vmlinuz files use the names that apply to you. Save and close the file.

Reboot into the installer.
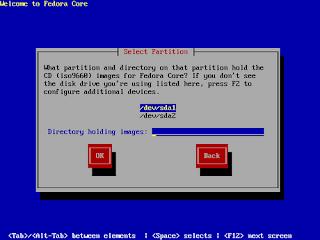
Next reboot your computer and from the list of boot targets select the 'Fedora 9 install' entry. The installer will then run presenting you with a screen first asking for your language and keyboard layout.

The next screen asks for the install source, select 'Hard Drive' from the list. From the screen shown below select the partition on your hard drive that contains the Fedora iso you downloaded along with the directory containing the image (as instructed you can press F2 here to
browse for the iso file).


Read more
0

Firefox vs. Safari vs. IE vs. Opera

The top browsers face off in a battle royal...

Web 2.0 applications and sites place the focus firmly on browser performance. Anyone who still believes that the speed of your DSL connection is the only potential bottleneck is gravely mistaken. Key parts of Ajax applications run locally, which means that — all other things being equal — the speed of the browser will be crucial in determining the user experience. For Ajax-based business applications, the browser becomes even more important because data will be accessed from within-firewall servers rather than the internet. Companies deploying such solutions will be able to improve employee productivity by paying attention to browser performance.

More


Read more
0

Ubuntu 8.04 vs. Fedora 9

They do declare a winner in the end, sort of...

...in the past three years, a few distributions have made stupendous leaps in performance and usability, winning the affection of millions of mainstream desktop users.

The recent releases of Ubuntu 8.04 and Fedora 9 — two top Linux distributions — mark another step forward in the evolution of the Linux desktop. I've been running both of them to see which offers the better blend of usability and advanced features.

More
Read more
3

How to protect your server from DDos Attack

What is DDos attack:
On the Internet, a distributed denial-of-service (DDoS) attack is one in which a multitude of compromised systems attack a single target, thereby causing denial of service for users of the targeted system. The flood of incoming messages to the target system essentially forces it to shut down, thereby denying service to the system to legitimate users.

There is a perl script which prevent this:
First do the Installation of a simple perl script:

wget http://www.inetbase.com/scripts/ddos/install.sh
chmod 0700 install.sh
./install.sh

Uninstalling:
wget http://www.inetbase.com/scripts/ddos/uninstall.ddos
chmod 0700 uninstall.ddos
./uninstall.ddos

When you run this Perl script, it will then run an netstat command check how many times each IP is connected and if there are more then the number of connections you specified then it will automatically run a command in APF for the IP to be banned.


Read more
0

HowTo Create a Driver Diskette from an Image File

To create a driver diskette from a driver diskette image:

  1. Insert a blank, formatted diskette into the first diskette drive.

  2. From the same directory containing the driver diskette image, such as drvnet.img, type
    dd if=drvnet.img of=/dev/fd0 as root.

Wait for sometime before system writes the diriver files into the diskette.
Read more
1

How to rename all files in directory at once

wget -c http://easylinux.info/uploads/mvb_1.6.tgz
tar zxvf mvb_1.6.tgz -C /usr/share/
chown -R root:root /usr/share/mvb_1.6/
ln -fs /usr/share/mvb_1.6/mvb /usr/bin/mvb

To rename all files in directory at once

mvb NEW_NAME
Read more
1

How to add multiple IP addresses manually?

There are cases where one has to bind multiple ip address to same ethernet card, here are some steps to add them into your network configuration.

# ifconfig

will output all the configured addresses. For example:

eth0: inet addr:10.10.10.10 Bcast:10.10.10.255 Mask:255.255.255.0
...... and more information.

To add on extra IP addresses type:

# ifconfig eth0:1 11.11.11.12 netmask 255.255.255.0

for additional IP addresses, make sure you increment the 1 in eth0:1, for example, a third IP address (third one including your BASE IP) would be added:

# ifconfig eth0:2 11.11.11.13 netmask 255.255.255.0

Hope it helps anyone struggling!
Read more
0

Windows COM Ports equivalent in Linux


DevicesWindows Com PortLinux equivalent
MouseCOM 1/dev/ttyS0
External ModemCOM 2/dev/ttyS1
Floppy DriveNormal Floppy cable/dev/fd0
PrinterLpt Port/dev/lp0
CDROM DriveIDE cable/dev/cdrom

What does this mean is, Com 1 in Windows is /dev/ttyS0 in Linux everywhere
Read more
0

How to quickly bind a range of IPs on RedHat based systems

In this short post I will show you how you can quickly add a range of IPs on any RedHat based system (Rhel, Centos, Fedora, etc). When you have to add many IPs to a system this can be quite handy and save a lot of time.

Normally when you add a new IP to a network interface in a RedHat based system you create a file ifcfg-eth0:x in /etc/sysconfig/network-scripts/. For example:

/etc/sysconfig/network-scripts/ifcfg-eth0:0
DEVICE=eth0:0ONBOOT=yesBOOTPROTO=staticIPADDR=192.168.0.100NETMASK=255.255.255.0NETWORK=192.168.0.0BROADCAST=192.168.0.255TYPE=Ethernet
Similar to the above example you can create several aliases. But what if you have to add a lot of IPs that are in a range like this? Let’s say that I want to add 100 IPs this way… this is possible, but not very effective, right? RedHat based systems offer a method to bind a range of IPs in a quick way allowing us to eliminate the need to create a lot of files and saving us time doing this.

Create a file /etc/sysconfig/network-scripts/ifcfg-eth0-range0 if this doesn’t exist, or just add to it if you already have it, the following lines: /etc/sysconfig/network-scripts/ifcfg-eth0-range0
IPADDR_START=192.168.0.100IPADDR_END=192.168.0.200CLONENUM_START=0
where: IPADDR_START is the first IP and IPADDR_END is the last IP in the range. CLONENUM_START is the number that will be assigned to the first IP alias interface (eth0:0 in this example).

If you need to add more ranges of IPs then just use a different file for ex. ifcfg-eth0-range1, for each one of the ranges. You need to be careful and use the proper CLONENUM_START to not overwrite other aliases. Once you have configured the range/s of IPs you just need to restart the network service in order to activate it:

service network restart
Read more
0

Sending email attachments from linux command line

Many times we required to send mail attachments from command line, when administering a server remotely. The procedure is simple using mutt that is available in all Unix flavors and Windows Microsoft.

$ mutt -s "Logs" -a http_access.log nikesh@domain.com

Or Without subject:

$ echo | mutt -a [file] [mail@address.com]

Mutt website: http://www.mutt.org/.
Read more
0

Disable users from loggin into the server, except the administrator

In cases where you have to disable the login to all users,except root, for example when you have to do a backup, you have to use pam_nologin.so (man nologin).

1) Edit the pam file for the service you want to control, in this example i modify ssh pam control file, located in /etc/pam.d/sshd

Add this line
account required pam_nologin.so

2) Create the /etc/nologin file, just do "touch /etc/nologin"

This should disable the login from ssh. If you want to disable the login from terminal, modify the /etc/pam.d/login file.

3) To re-enable the login just remove /etc/nologin
Read more
0

Install PHP5 on Ubuntu


PHP is a general-purpose scripting language suited for Web development. The PHP script can be embedded into HTML. This section explains how to install and configure PHP5 in Ubuntu System


Installation


To install PHP5 you can enter the following command in the terminal prompt:

sudo apt-get install php5 libapache2-mod-php5

You can run PHP5 scripts from command line. To run PHP5 scripts from command line you should install php5-cli package. To install php5-cli you can enter the following command in the terminal prompt:

sudo apt-get install php5-cli

You can also execute PHP5 scripts without installing PHP5 Apache module. To accomplish this, you should install php5-cgi package. You can run the following command in a terminal prompt to install php5-cgi package:

sudo apt-get install php5-cgi

To use MySQL with PHP5 you should install php5-mysql package. To install php5-mysql you can enter the following command in the terminal prompt:

sudo apt-get install php5-mysql
Read more
0

Checking your CDs with cdck

We all know that CDs don't live forever. Often loss of data is predictable when the disc is starts to take longer to read, but these changes in speed are often enough too small to be noticed or something else (like the overall system load) is taken responsible for it.

Therefor it is good to have a little tool that analyzes your discs properly so that you can make a backup in time. Such a tool is cdck. It's just a small command-line program, but as many Unix-tools it is a specialized tool which does it's job right.

It reads the disc block by block and measures the time it takes to read each block. Based on these statistics you get a summary about the current quality of your CD or DVD. If you like you can even output a graph which can then be displayed in GNUPlot.


Read more
0

google gadgets for linux

google gadgets for linux
Google Gadgets for Linux provides a platform for running desktop gadgets under Linux, catering to the unique needs of Linux users, this project is open-sourced, under the Apache License.

The Windows and Mac versions of Google Desktop has provided gadget hosting functionality on Windows and Mac for a while now and the Linux version of Google Gadgets will extend this platform to Linux users. By enabling cross-platform gadgets, a large library of existing gadgets are immediately available to Linux users. In addition, gadget developers will benefit from a much larger potential user base without having to learn a new API.

There's two main components to the application: one is a common gadget library responsible for running and presenting a gadget, and the other is a host program that allows the user to choose gadgets and run them on the desktop. Currently they have hosts written for GTK+ and QT, with the GTK+ host offering a sidebar similiar to that of Google Desktop for Windows.

Download: Here
Read more
0

Convert your videos quickly, easily, and all at once with WinFF and FFmpeg

Convert your videos quickly, easily, and all at once with WinFF and FFmpeg
WinFF is a GUI for the command line video converter, FFMPEG. It will convert most any video file that FFmpeg will convert. WinFF does multiple files in multiple formats at one time. You can for example convert mpeg's, flv's, and mov's, all into avi's all at once. WinFF is available for Windows 95, 98 , ME, NT, XP, VISTA, and Debian, Ubuntu, Redhat based GNU/Linux distributions.


Read more
Related Posts with Thumbnails