linux poison RSS
linux poison Email
3

Extract Images From a Video, or Create a Video from Images using ffmpeg in Linux

FFmpeg is a complete, cross-platform solution to record, convert and stream audio and video. It includes libavcodec - the leading audio/video codec library.

ffmpeg is a wonderful library for creating video applications or even general purpose utilities. ffmpeg takes care of all the hard work of video processing by doing all the decoding, encoding, muxing and demuxing for you. This can make media applications much simpler to write. It's simple, written in C, fast, and can decode almost any codec you'll find in use today, as well as encode several other formats.

Installation:
OpenSuSe user can use "1-click" installer to install ffmpeg - here

Ubuntu user can install ffmpeg using command: sudo apt-get install ffmpeg

Extracting images from a video:
ffmpeg -i foo.avi -r 1 -s WxH -f image2 foo-%03d.jpeg
This will extract one video frame per second from the video and will output them in files named `foo-001.jpeg', `foo-002.jpeg', etc. Images will be rescaled to fit the new WxH values.

If you want to extract just a limited number of frames, you can use the above command in combination with the -vframes or -t option, or in combination with -ss to start extracting from a certain point in time.

Creating a video from many images:
ffmpeg -f image2 -i foo-%03d.jpeg -r 12 -s WxH foo.avi
The syntax foo-%03d.jpeg specifies to use a decimal number composed of three digits padded with zeroes to express the sequence number. It is the same syntax supported by the C printf function, but only formats accepting a normal integer are suitable.
Read more
1

Minitube : Youtube Desktop Client for Linux

Minitube is a native YouTube client. With it, you can watch YouTube videos in a new way: you type a keyword, and Minitube gives you an endless video stream. Minitube does not require the Flash Player. It is not about cloning the original YouTube Web interface, but strives to create a new TV-like experience.

Installation:
OpenSuSe user can use "1-click" installer to install minitube - here

Ubuntu users needs to download .deb package from getdeb
Now you should be having minitube_0.8.1-1~getdeb1_i386.deb file install this .deb file using the following command: sudo dpkg -i minitube_0.8.1-1~getdeb1_i386.deb


The interface is clean and simple. You're greeted with a simple search box upon first launching Minitube. Enter your query, and results are displayed in a column. They'll automatically play one after another,


Read more
2

Checking Webserver Vulnerabilities using Nikto

Nikto is a web server scanner which performs comprehensive tests against web servers for multiple items, including over 3500 potentially dangerous files/CGIs, versions on over 900 servers, and version specific problems on over 250 servers.

Scan items and plugins are frequently updated and can be automatically updated (if desired).

Nikto is built on LibWhisker and can run any platform which has a Perl environment, and supports SSL, proxies, host authentication, IDS evasion and more.

Nikto not only checks for CGI vulnerabilities but does so in an evasive manner, so as to elude intrusion detection systems. It comes with thorough documentation which should be carefully reviewed prior to running the program. If you have Web servers serving up CGI scripts, Nikto can be an excellent resource for checking the security of these servers.

Installation:
OpenSuSe user can install nikto using "1-click" installer - here
Ubuntu / Debian: $ sudo apt-get install nikto

Using Nikto:
The most basic Nikto scan requires simply a host to target, since port 80 is assumed if none is specified. The host can either be an IP or a hostname of a machine, and is specified using the -h (-host) option. This will scan the IP 192.168.1.2 on TCP port 80: nikto -h 192.168.1.2


To check on a different port, specify the port number with the -p (-port) option. This will scan the IP 192.168.0.1 on TCP port 443:  
nikto -h 192.168.1.2 -p 443
Hosts, ports and protocols may also be specified by using a full URL syntax, and it will be scanned:
nikto -h https://192.168.0.1:443/
Updating
Nikto can be automatically updated, To update to the latest plugins and databases, simply run Nikto with the -update command: nikto -update

If updates are available, you will see a list of the files getting downloaded.

 
Read more
7

Darkstat - Web Based Network Traffic & Bandwidth Monitoring Tool on Linux

darkstat is an ntop-workalike network statistics gatherer. It runs as a background process on a cable or DSL router, uses libpcap to capture network traffic, and has a Web interface that serves up reports of statistics such as data transferred by host, port, and protocol. It also has a neat bandwidth usage graph.

Author of the program, Emil Mikulic, had "ntop" in use for a long time. But he was disaffected of its stability issues and its bad memory behavior. For this reason he developed "darkstat".

Installation:
OpenSuSe user can use "1-click" installer to install darkstat - here
Ubuntu / debian: $ sudo apt-get install darkstat

To start DarkStat
# darkstat -i eth0
where “eth0″ is the interface that you monitor traffic coming in and going out. Change it as in your system.

Now, darkstat starts and sniffs in the background and loads a simple web interface at http://localhost:667 or if you are browsing from a different machine then http://:667 (example: http://192.168.1.1:667)


At the "hosts" tab you can see all the machines which take part in the communication. These can be arranged by the caused traffic or their particular IP address. By this possibility you can detect the machines, which have produced the highest traffic in the local network, very fast. Thereby the responsible system administrator has a chance to get to the bottom of a problem.


Read more
3

Optimize DNS lookup time using NameBench

When you use the Web or send an e-mail message, you use a domain name to do it. For example, the URL "http://linuxpoison.blogspot.com/" contains the domain name blogspot.com.

Human-readable names like "linuxpoison.blogspot.com" are easy for people to remember, but they don't do machines any good. All of the machines use names called IP addresses to refer to one another. For example, the machine that humans refer to as "linuxpoison.blogspot.com" has the IP address 209.85.153.191. Every time you use a domain name, you use the Internet's domain name servers (DNS) to translate the human-readable domain name into the machine-readable IP address. Speeding up DNS lookups is one of the simplest, and most effective ways to speed up browsing.


Namebench. hunts down the fastest DNS servers available for your computer to use. namebench runs a fair and thorough benchmark using your web browser history, tcpdump output, or standardized datasets in order to provide an individualized recommendation. namebench is completely free and does not modify your system in any way. This project began as a 20% project at Google.

namebench runs on Mac OS X, Windows, and UNIX, and is available with a graphical user interface as well as a command-line interface.

Installation:
Download NameBench from here
Go to terminal (root) and type following command to install and run NameBench:

tar -zxvf namebench-1.0.5.tgz
cd namebench-1.0.5/
python setup.py install
./namebench.py


namebench will test the nameservers your machine is currently using, plus the popular global DNS services, and the best 4-6 additional name servers that it can find for you. It will output some text-graphs and URL's for more a more detailed performance analysis of each nameserver.

If you want to specify an additional set of name services, simply add the IP to the command-line, or edit namebench.cfg:

  ./namebench.py 10.0.0.1 192.168.0.1


Here are my DNS server test results:


Read more
2

Multiget - Multi-Threaded Graphical Download Manager for Ubuntu / Debian / OpenSuSe Linux

MultiGet is an easy-to-use GUI file downloader for Windows/Linux/BSDs/MacOs.  It's programmed in C++ and has a GUI based on wxWidgets. It supports HTTP/FTP protocols which covers the requirements of most users. It supports multi-task with multi-thread on multi-server. It supports resuming downloads if the Web server supports it, and if you like, you can reconfig the thread number without stopping the current task. It's also support SOCKS 4,4a,5 proxy, ftp proxy, http proxy.

Installation:
Ubuntu: $ sudo apt-get install multiget
OpenSuSe user can use "1-click" installer to install MultiGet - here
You can start MultiGet in Ubuntu by going to Applications > Internet > MultiGet


Once installed, Multiget monitors your clipboard for download links -- or you can start putting the app to use via its floating drop box. Find something you want to download in your favorite browser, then click and drag a link onto the box to initiate the transfer. Downloads can also be started via Multiget's task menu.
Read more
3

Handbrake - Multiplatform, Multithreaded DVD to MPEG-4 Converter & Transcoder

HandBrake is an open-source, GPL-licensed, multiplatform, multithreaded DVD to MPEG-4 converter. This software application therefore lets you compress DVDs so that they take less space on a hard disk.

HandBrake is a console (command-line interface) & GUI based  tool. The application requires many switches and variables to begin the conversion of a DVD to an MPEG video file.

Features include:
Supported sources:
Any DVD-like source: VIDEO_TS folder, DVD image or real DVD (encrypted or unencrypted, but protection methods other than CSS are not supported and must be handled externally with third-party software), and some .VOB and .TS files PAL or NTSC AC-3, DTS, LPCM or MPEG audio tracks

Outputs:
File format: MP4, MKV, AVI or OGM
Video: MPEG-4 or H.264 (1 or 2 passes or constant quantizer/rate encoding)
Audio: AAC, MP3, Vorbis or AC-3 pass-through (supports encoding of several audio tracks)

Misc features:
Chapter selection
Basic subtitle support (burned into the picture)
Integrated bitrate calculator
Picture deinterlacing, cropping and scaling
Grayscale encoding

Installing HandBrake
It is extremely easy to install HandBrake on Ubuntu 9.10 , HandBrake provides easily installable .deb file for Ubuntu 8.10. To install HandBrake issue the following command in the terminal window (Application >> Accessories >> Terminal)

wget http://handbrake.fr/rotation.php?file=HandBrake-0.9.4-Ubuntu_GUI_i686.deb
sudo dpkg -i HandBrake-0.9.4-Ubuntu_GUI_i686.deb

This should install HandBrake onto your system , you can launch HandBrake from (Applications >> Sound Video >> HandBrake ).

OpenSuSe user can use "1-click" installer to install Handbrake - here


Using Handbrake
The first time you launch Handbrake you should see a number of predefined presets on right hand side of the Window , allowing you to easily configure Handbrake to convert videos to format capable of being played on number of devices.

Once you have selected the device you want to convert video for, configure/tweak the settings further and select source to select the source video which you would like to convert to suitable format, Also select the destination where you would like to save the video. Now , press Start button to start encoding the video.
Read more
2

How to do CPU hotplug in Linux

WHY DO WE NEED HOTPLUG CPU?

As Linux becomes more prominent in the enterprise arena in mission critical data center type installations, features that support RAS (Reliability, Availability and Serviceability) are required. Since modern processor architectures provide advanced error and detection technology, offering the possibility to add and remove CPUs becomes extremely important for RAS support.

However CPU hotplug is not just useful to replace defective components it can also be applied in other contexts to increase the productivity of a system. For example on a single system running multiple Linux partitions, as the workloads change it would be extremely useful to be able to move CPUs from one partition to the next as required without rebooting or interrupting the workloads.This is known as dynamic partitioning.  Other applications include Instant Capacity on Demand where extra CPUs are present in a system but aren't activated. This is useful for customers that predict growth and therefore the need for more computing power but do not have at the time of purchase the means to afford.

First Get the list of CPU present in your system
    # cd /sys/devices/system/cpu
    # ls -l
      total 0
      drwxr-xr-x  10 root root 0 Sep 19 07:44 .
      drwxr-xr-x  13 root root 0 Sep 19 07:45 ..
      drwxr-xr-x   3 root root 0 Sep 19 07:44 cpu0
      drwxr-xr-x   3 root root 0 Sep 19 07:44 cpu1
      drwxr-xr-x   3 root root 0 Sep 19 07:44 cpu2
      drwxr-xr-x   3 root root 0 Sep 19 07:44 cpu3
      drwxr-xr-x   3 root root 0 Sep 19 07:44 cpu4
      drwxr-xr-x   3 root root 0 Sep 19 07:44 cpu5
      drwxr-xr-x   3 root root 0 Sep 19 07:44 cpu6
      drwxr-xr-x   3 root root 0 Sep 19 07:48 cpu7
Under each directory you would find an "online" file which is the control file to logically online/offline a processor.

Do the following to put a specific CPU offline:
    # echo 0 > /sys/devices/system/cpu/cpu7/online
Once the logical offline is successful, check
    # cat /proc/interrupts
You should now not see the CPU that you removed. Also online file will report the state as 0 when a cpu if offline and 1 when its online.

To display the current cpu state: # cat /sys/devices/system/cpu/cpu7/online

Read more
0

How To Install Additional true-type (ttf) Fonts in Linux


If you are sitting at a Windows or Macintosh computer right now, then you are looking at a TrueType font as you read this! Fonts are the different styles of typefaces used by a computer to display text.

Installing true-type fonts in Ubuntu/Fedora/OpenSuse is an easy task. One can find thousands of free fonts on the Internet (from sites such as 1001 Free Fonts or DaFont), and with this one could add that extra spice to your documents or websites.

Installation:
First, find and download your desired fonts into /home/nikesh/fonts diretory (user directory). Then extract them and copy to the system fonts directory as follows:
cd /usr/share/fonts/truetype
sudo mkdir customFonts
cd customFonts
sudo cp /home/nikesh/fonts/*.ttf .
sudo chown root.root *.ttf
sudo mkfontdir
cd ..
fc-cache
Now open Open Office Writer or Gimp, and your fonts should be available! You can access your new true type fonts in any graphics, design, text based document application that uses fonts.
Read more
0

How To Convert Existing ext3 non-root FileSystem to ext4 FileSystem

Any existing Ext3 filesystem can be migrated to Ext4 with an easy procedure (as long as you are converting a filesystem that can be unmounted and which is non-root) which consists in running a couple of commands.

This means that you can improve the performance, storage limits and features of your current filesystems without reformatting and/or reinstalling your OS and software environment.

First, unmount the partition: umount /dev/sda1

Next, run a filesystem check on it to make sure it is in sane condition.
fsck.ext3 -pf /dev/sda1
Enable new features of ext4 on the filesystem
tune2fs -O extents,uninit_bg,dir_index  /dev/sda1
Run a filesystem check. to make sure that the filesystem is now clean.
fsck -pf /dev/sda1
Now edit your /etc/fstab file and replace "ext3" with "ext4" for /dev/sda1. Other options may differ for your system.
/dev/sda1 /disk ext4 defaults 0 2
Try to mount your new ext4 filesystem: mount /disk
Read more
1

Understanding Packet Filtering using iptables

The Linux kernel uses the Netfilter facility to filter packets, allowing some of them to be received by or pass through the system while stopping others. This facility is built in to the Linux kernel, and has three built-in tables or rules lists, as follows:

    * filter — The default table for handling network packets.
    * nat — Used to alter packets that create a new connection and used for Network Address Translation (NAT).
    * mangle — Used for specific types of packet alteration.

Each table has a group of built-in chains, which correspond to the actions performed on the packet by netfilter.
The built-in chains for the filter table are as follows:

    * INPUT — Applies to network packets that are targeted for the host.
    * OUTPUT — Applies to locally-generated network packets.
    * FORWARD — Applies to network packets routed through the host.

The built-in chains for the nat table are as follows:

    * PREROUTING — Alters network packets when they arrive.
    * OUTPUT — Alters locally-generated network packets before they are sent out.
    * POSTROUTING — Alters network packets before they are sent out.

The built-in chains for the mangle table are as follows:

    * INPUT — Alters network packets targeted for the host.
    * OUTPUT — Alters locally-generated network packets before they are sent out.
    * FORWARD — Alters network packets routed through the host.
    * PREROUTING — Alters incoming network packets before they are routed.
    * POSTROUTING — Alters network packets before they are sent out.

Every network packet received by or sent from a Linux system is subject to at least one table. However, a packet may be subjected to multiple rules within each table before emerging at the end of the chain. The structure and purpose of these rules may vary, but they usually seek to identify a packet coming from or going to a particular IP address, or set of addresses, when using a particular protocol and network service.

Regardless of their destination, when packets match a particular rule in one of the tables, a target or action is applied to them. If the rule specifies an ACCEPT target for a matching packet, the packet skips the rest of the rule checks and is allowed to continue to its destination. If a rule specifies a DROP target, that packet is refused access to the system and nothing is sent back to the host that sent the packet. If a rule specifies a QUEUE target, the packet is passed to user-space. If a rule specifies the optional REJECT target, the packet is dropped, but an error packet is sent to the packet's originator.

Every chain has a default policy to ACCEPT, DROP, REJECT, or QUEUE. If none of the rules in the chain apply to the packet, then the packet is dealt with in accordance with the default policy.

Note: The iptables service starts before any DNS-related services when a Linux system is booted. This means that firewall rules can only reference numeric IP addresses (for example, 192.168.0.1). Domain names (for example, host.example.com) in such rules produce errors.
Read more
0

How To Identify Which Ports (or Services) Are Listening/Open

There are two basic approaches for listing the ports that are listening on the network. The less reliable approach is to query the network stack using commands such as netstat -an or lsof -i. This method is less reliable since these programs do not connect to the machine from the network, but rather check to see what is running on the system. For this reason, these applications are frequent targets for replacement by attackers. Crackers attempt to cover their tracks if they open unauthorized network ports by replacing netstat and lsof with their own, modified versions.

A more reliable way to check which ports are listening on the network is to use a port scanner such as nmap.The following command issued from the console determines which ports are listening for TCP connections from the network:
nmap -sT -O localhost
The output of this command appears as follows:
Starting Nmap 5.00 ( http://nmap.org ) at 2009-12-05 01:11 IST
Warning: Hostname localhost resolves to 2 IPs. Using 127.0.0.1.
Interesting ports on localhost (127.0.0.1):
Not shown: 994 closed ports
PORT     STATE SERVICE
21/tcp   open  ftp
22/tcp   open  ssh
25/tcp   open  smtp
80/tcp   open  http
3128/tcp open  squid-http
3306/tcp open  mysql
Device type: general purpose
Running: Linux 2.6.X
OS details: Linux 2.6.15 - 2.6.27
Network Distance: 0 hops

OS detection performed. Please report any incorrect results at http://nmap.org/submit/ .
Nmap done: 1 IP address (1 host up) scanned in 2.15 seconds
Next, check for information about the port using netstat or lsof. To check for port 3128 using netstat, use the following command:
netstat -anp | grep 3128
The command returns the following output:

tcp        0      0 127.0.0.1:3128          0.0.0.0:*                        LISTEN      1909/(squid)
tcp        0      0 127.0.0.1:3128          127.0.0.1:52913         TIME_WAIT   -
tcp        0      0 127.0.0.1:3128          127.0.0.1:52914         TIME_WAIT   -

The lsof command reveals similar information to netstat since it is also capable of linking open ports to services:
lsof -i | grep 3128
Read more
0

How to Verify Signed Fedora Packages

All Fedora packages are signed with the Fedora GPG key. GPG stands for GNU Privacy Guard, or GnuPG, a free software package used for ensuring the authenticity of distributed files. For example, a private key (secret key) locks the package while the public key unlocks and verifies the package. If the public key distributed by Fedora does not match the private key during RPM verification, the package may have been altered and therefore cannot be trusted.

The RPM utility within Fedora automatically tries to verify the GPG signature of an RPM package before installing it. If the Fedora GPG key is not installed, install it from a secure, static location, such as an Fedora installation CD-ROM or DVD.

Assuming the fedora installation disc is mounted in /mnt/cdrom, use the following command to import it into the keyring (a database of trusted keys on the system):
rpm --import /mnt/cdrom/RPM-GPG-KEY
To display a list of all keys installed for RPM verification, execute the following command:
rpm -qa gpg-pubkey*
The output will look similar to the following:
gpg-pubkey-db42a60e-37ea5438
To display details about a specific key, use the rpm -qi command followed by the output from the previous command, as in this example:
rpm -qi gpg-pubkey-db42a60e-37ea5438
It is extremely important to verify the signature of the RPM files before installing them to ensure that they have not been altered from the original source of the packages. To verify all the downloaded packages at once, issue the following command:
rpm -K /tmp/updates/*.rpm
For each package, if the GPG key verifies successfully, the command returns gpg OK. If it doesn't, make sure you are using the correct Fedora public key, as well as verifying the source of the content. Packages that do not pass GPG verifications should not be installed, as they may have been altered by a third party.

After verifying the GPG key and downloading all the packages associated with the errata report, install the packages as root at a shell prompt.
Read more
1

How to Use & Configure Google Public DNS on Linux System


When you use Google Public DNS, you are changing your DNS operator from your ISP to Google Public DNS.

In most cases, the IP addresses used by your ISP's domain name servers are automatically set by your ISP via the Dynamic Host Configuration Protocol (DHCP). To use Google Public DNS, you need to explicitly change the DNS settings in your operating system or device to use the Google Public DNS IP addresses. The procedure for changing your DNS settings varies according to operating system and version (Windows, Mac or Linux) or the device (computer, phone, or router).

Benefits and enhancements:
Performance: Many DNS service providers are not sufficiently provisioned to be able to support high-volume input/output and caching, and adequately balance load among their servers. In addition to load-balancing user traffic to ensure shared caching, Google Public DNS implements "smart" caching to increase the speed of responses. Google Public DNS independently resolves domain names and keeps the resolutions in the cache until their time-to-live (TTL) expires, at which point they are automatically refreshed. The cycle of caching and refreshing is performed offline, asynchronously with user requests, so that responses are almost always available directly from cache.

Security: DNS is vulnerable to various kinds of spoofing attacks that can "poison" a nameserver's cache and route its users to malicious sites. The prevalence of DNS exploits means that providers have to frequently apply server updates and patches. In addition, open DNS resolvers are vulnerable to being used to launch denial-of-service (DoS) attacks on other systems. To defend against such attacks, Google has implemented several recommended solutions to help guarantee the authenticity of the responses it receives from other nameservers, and to ensure Google servers are not used for launching DoS attacks. These include adding entropy to requests, rate-limiting client traffic, and more.

Correct results: Google Public DNS does its best to return the right answer to every query every time, in accordance with the DNS standards. Sometimes, in the case of a query for a mistyped or non-existent domain name, the right answer means no answer, or an error message stating the domain name could not be resolved. Google Public DNS never blocks, filters, or redirects users, unlike some open resolvers and ISPs.

Configuration:
Note: Before you change your DNS settings to use Google Public DNS, be sure to write down the current server addresses or settings on a piece of paper. It is very important that you keep these numbers for backup purposes, in case you need to revert to them at any time.

The Google Public DNS IP addresses are as follows:
    8.8.8.8
    8.8.4.4
You can use either number as your primary or secondary DNS server. You can specify both numbers, but do not specify one number as both primary and secondary.

1) Edit /etc/resolv.conf:
sudo vi /etc/resolv.conf
2) Replace the nameserver lines with, or add, the following lines:
nameserver 8.8.8.8
nameserver 8.8.4.4
3) Save and exit.
4) Restart any Internet clients you are using.

Configuring DHCP client for dynamic ip address:
1) Edit /etc/dhclient.conf:
sudo vi /etc/dhclient.conf
2) If there is a line containing domain-name-servers, write down the IP addresses for future reference. Replace that line with, or add, the following line:
prepend domain-name-servers 8.8.8.8, 8.8.4.4;
2) Save and exit.
4) Restart your system.
Read more
0

How to Convert smbpasswd to tdbsam on Samba

The latest release of Samba offers many new features including new password database backends not previously available. Samba version 3.0.0 fully supports all databases used in previous versions of Samba. However, although supported, many backends may not be suitable for production use.

The tdbsam backend provides an ideal database back-end for local servers, servers that do not need built-in database replication, and servers that do not require the scalability or complexity of LDAP. The tdbsam back-end includes all of the smbpasswd database information as well as the previously-excluded SAM information. The inclusion of the extended SAM data allows Samba to implement the same account and system access controls as seen with Windows NT/2000/2003-based systems.

The tdbsam backend is recommended for 250 users at most. Larger organizations should require Active Directory or LDAP integration due to scalability and possible network infrastructure concerns.

Convert smbpasswd to tdbsam: enter as root on the command line:
      pdbedit -i smbpasswd:/etc/samba/smbpasswd -e tdbsam:/etc/samba/passdb.tdb
      And ensure the global section of smb.conf has such an entry:
      passdb backend = tdbsam
Read more
0

How to use Redirection and Pipes on Linux System

Redirection
With > you can forward the output of a command to a file (output redirection), with < you can use a file as input for a command (input redirection).

Pipe
By means of a pipe symbol | you can also redirect the output: with a pipe, you can combine several commands, using the output of one command as input for the next command. In contrast to the other redirection symbols > and <, the use of the pipe is not constrained to files.

Examples (Redirection):
1) To write the output of a command like ls to a file, enter
ls -l > filelist.txt
This creates a file named filelist.txt that contains the list of contents of your current directory as generated by the ls command.

However, if a file named filelist.txt already exists, this command overwrites the existing file. To prevent this, use >> instead of >. Entering
ls -l >> filelist.txt
simply appends the output of the ls command to an already existing file named filelist.txt. If the file does not exist, it is created.

2) Redirections also works the other way round. Instead of using the standard input from the keyboard for a command, you can use a file as input:
sort < filelist.txt
This will force the sort command to get its input from the contents of filelist.txt. The result is shown on the screen. Of course, you can also write the result into another file, using a combination of redirections:
sort  < filelist.txt > sorted_filelist.txt
Example (Pipe):
If a command generates a lengthy output, like ls -l may do, it may be useful to pipe the output to a viewer like less to be able to scroll through the pages. To do so, enter
ls -l | less
The list of contents of the current directory is shown in less.

The pipe is also often used in combination with the grep command in order to search for a certain string in the output of another command. For example, if you want to view a list of files in a directory which are owned by the user tux, enter
ls -l | grep tux
Read more
0

Linux Standard Directory Structure

Directory
Description
/
Root directory—the starting point of the directory tree.
/bin
Essential binary files, such as commands that are needed by both the system administrator and normal users. Usually also contains the shells, such as Bash.
/boot
Static files of the boot loader.
/dev
Files needed to access host-specific devices.
/etc
Host-specific system configuration files.
/home
Holds the home directories of all users who have accounts on the system. However, root's home directory is not located in /home but in /root.
/lib
Essential shared libraries and kernel modules.
/media
Mount points for removable media.
/mnt
Mount point for temporarily mounting a file system.
/opt
Add-on application software packages.
/root
Home directory for the superuser root.
/sbin
Essential system binaries and commands that are needed by system administrator.
/tmp
Temporary files.
/usr
Secondary hierarchy with read-only data.
/var
Variable data such as log files.
/windows
Only available if you have both Microsoft Windows* and Linux installed on your system. Contains the Windows data.
Read more
1

Advanced Linux Process Monitor - htop

Most people familiar with Linux have used the top command line utility to see what process is taking the most CPU or memory. There’s a similar utility called htop that is much easier to use for normal tasks.

htop is an interactive process viewer for Linux. It aims to be a 'better top': you can scroll the process list vertically and horizontally, and select a process to be killed with the arrow keys instead of by typing its process id. It requires ncurses

Comparison between htop and top
    * In 'htop' you can scroll the list vertically and horizontally to see all processes and complete command lines.
    * In 'top' you are subject to a delay for each unassigned key you press (especially annoying when multi-key escape sequences are triggered by accident).
    * 'htop' starts faster ('top' seems to collect data for a while before displaying anything).
    * In 'htop' you don't need to type the process number to kill a process, in 'top' you do.
    * In 'htop' you don't need to type the process number or the priority value to renice a process, in 'top' you do.
    * 'htop' supports mouse operation, 'top' doesn't
    * 'top' is older, hence, more used and tested.

Installation
Ubuntu users can 'upgrade' top to htop by installing htop using the Advanced Package Tool:

    sudo apt-get install htop

OpenSuSe 11.2 users can use "1-click" installer to install htop - here
Once installed, just type htop at a terminal to launch it, and notice the great text-mode graph at the top of the display:


Here is the best part… just use your Up/Down arrow keys to select a process, and then you can kill it with the F9 key if you’d like, or you can change the priority by using the F7 and F8 keys. (note that you’ll have to be root to give anything really high priority).
Read more
2

Easy Data Encryption with TrueCrypt on Linux (Ubuntu/OpenSuSe) System

TrueCrypt is a software system for establishing and maintaining an on-the-fly-encrypted volume (data storage device). On-the-fly encryption means that data is automatically encrypted or decrypted right before it is loaded or saved, without any user intervention. No data stored on an encrypted volume can be read (decrypted) without using the correct password/keyfile(s) or correct encryption keys. Entire file system is encrypted (e.g., file names, folder names, contents of every file, free space, meta data, etc).

Files can be copied to and from a mounted TrueCrypt volume just like they are copied to/from any normal disk (for example, by simple drag-and-drop operations). Files are automatically being decrypted on the fly while they are being read or copied from an encrypted TrueCrypt volume. Similarly, files that are being written or copied to the TrueCrypt volume are automatically being encrypted on the fly.

It's also possible to access the same encrypted partition/volume on multiple OSes, as long as they have TrueCrypt installed and are able to read the filesystem used on the disk. (So you still can't get at your ext3 filesystem on Windows!) This is particularly useful for encrypting the USB drive.

TrueCrypt Features:
* Creates a virtual encrypted disk within a file and mounts it as a real disk.
* Encrypts an entire partition or storage device such as USB flash drive or hard drive.
* Encrypts a partition or drive where Windows is installed (pre-boot authentication).
* Encryption is automatic, real-time (on-the-fly) and transparent.
* Parallelization and pipelining allow data to be read and written as fast as if the drive was not encrypted.
* Provides plausible deniability, in case an adversary forces you to reveal the password:
Hidden volume (steganography) and hidden operating system.
* Encryption algorithms: AES (256-bit key), Blowfish (448-bit key), CAST5 (128-bit key), Serpent (256-bit key), Triple DES, and Twofish ( 256-bit key) also supports cascading (eg, AES-Serpent-Twofish).

Installation:
OpenSuSe 11.2 user can use "1-click" installer - here

Ubuntu:
Go to the truecrypt web site at:http://www.truecrypt.org/downloads.php
Download the correct version, Once it is downloaded untar and unzip: tar zxvf truecrypt*

This will create an executable file which can begin the installation. One thing to note is that if you have any dependencies you must meet those before you can proceed.  Execute the file:

sh truecrypt*

TrueCrypt 6.3a Setup
___________________
Installation options:
1) Install truecrypt_6.3a-0_i386.deb
2) Extract package file truecrypt_6.3a-0_i386.deb and place it to /tmp
To select, enter 1 or 2:

Choose 1) to install, You will need to accept the license.

After installation go to terminal and type command: truecrypt to open up the application.


Read more
0

How to play Encrypted DVDs on Ubuntu Linux

To play encrypted DVDs, the libdvdcss2 package is essential. libdvdcss2 is a simple library designed for accessing DVDs like a block device without having to bother about the decryption. More information about this package can be found at VideoLAN.

You can install libdvdcss2 as a 64-bit .deb package without installing the Medibuntu repositories:
$ wget -c http://packages.medibuntu.org/pool/free/libd/libdvdcss/libdvdcss2_1.2.10-0.2medibuntu1_amd64.deb
$sudo dpkg -i libdvdcss2_1.2.10-0.2medibuntu1_amd64.deb
32-bit .deb package:
$ wget -c http://packages.medibuntu.org/pool/free/libd/libdvdcss/libdvdcss2_1.2.10-0.2medibuntu1_i386.deb
$ sudo dpkg -i libdvdcss2_1.2.10-0.2medibuntu1_i386.deb
You can also use guidelines provided at Medibuntu. This will install the Medibuntu repositories on your system and then install the libdvdcss2 package:
$ sudo wget http://www.medibuntu.org/sources.list.d/jaunty.list --output-document=/etc/apt/sources.list.d/medibuntu.list
$ sudo apt-get update
$ sudo apt-get install medibuntu-keyring
$ sudo apt-get update
$ sudo apt-get install libdvdcss2
You can also install 32 bit or 64 bit Windows multimedia codecs (if you haven't already done so using ubuntu-restricted-extras):

$ sudo apt-get install w32codecs
    or
$ sudo apt-get install w64codecs

Instead of downloading directly from Medibuntu, you could also use the script included with the libdvdread4 package to download and install libdvdcss2:
$ sudo apt-get install libdvdread4
$ sudo /usr/share/doc/libdvdread4/install-css.sh
Read more
0

How to Create a .deb package from Source files

If your build from source is successful, you can make a Debian (Ubuntu) package (.deb) for future use or can distribute to other users:

Install package tools: sudo apt-get install checkinstall

CheckInstall keeps track of all files installed by a "make install" or equivalent, creates a Slackware, RPM, or Debian package with those files, and adds it to the installed packages database, allowing for easy package removal or distribution.

Rebuild package using "checkinstall":
cd /path/to/extracted/package
./configure
sudo make
sudo checkinstall
Keep the resulting ".deb" file for future use. It can later be installed using:

sudo dpkg -i packagename.deb

Note: These are basic instructions that may not always work. Some packages require additional dependencies and optional parameters to be specified in order to build them successfully. Also see these Ubuntu wiki instructions.
Read more
1

How to Watch Log Files in Realtime - Tailf

The most widely used command for monitoring log file is tail. Tail binary allows a user to watch the log file grow in realy time. Watching the log file grows can be done using an additional -f parameter. Alternatively, another approach to watch a log file grows can be done using tailf binary command.

Tailf:
tailf  will  print  out  the  last 10 lines of a file and then wait for the file to grow.  It is similar to tail -f but does not access the file when it is  not  grow-ing. This  has the side effect of not updating the access time for the file, so a filesystem flush does not occur periodically when no log activity is happening.

tailf is extremely useful for monitoring log files on  a  laptop  when  logging  is    infrequent  and  the  user desires that the hard disk spin down to conserve battery life.

Example: # tailf /var/log/squid/access.log

Similarly you can watch the same log file using -f argument

Example: # tail -f /var/log/squid/access.log
Read more
0

HOW-TO convert DAA (Direct Access Archive) files to ISO in Linux

The .daa file extension stands for 'Direct Access Archive' is a proprietary file format developed by PowerISO Computing for their CD/DVD image file-processing tool "PowerISO".

Unlike the majority of CD/DVD image formats, the PowerISO's .daa format allows advanced features such as file compression, password protection, encryption and the ability to split files in to multiple volumes. Due to these advanced features, PowerISO is the only software package that can read .daa files.

But it is very simple to convert DAA to ISO in linux. You just need an utility called daa2iso.

Install it on a RPM based system using ’sudo yum -y install daa2iso
or on a debian based system using ’sudo apt-get install daa2iso.

And to use the utility, just type the following: daa2iso source-file.daa dest-file.iso
Read more
0

How to Convert cue and bin files into an iso/cdr/wav file - BChunk

binchunker converts a CD image in a ".bin / .cue" format (sometimes ".raw / .cue") to a set of .iso and .cdr tracks. The bin/cue format is used by some popular non-Unix cd-writing software, but is not supported on most other CD burning programs. A lot of CD/VCD images distributed on the Internet are in BIN/CUE format.

The .iso track contains an ISO file system, which can be mounted through a loop device on Linux systems, or written on a CD-R using cdrecord. The .cdr tracks are in the native CD audio format. They can be either written on a CD-R using cdrecord -audio, or converted to WAV (or any other sound format for that matter) using sox. bchunk can also output audio tracks in WAV format.

Installation:
Debian / Ubuntu: sudo apt-get install bchunk
OpenSuSe 11.2 user can use "1-click" installer - here

Using bchunk:
Now enter the following command: bchunk
where the image.bin is the file that contains the actual data, image.cue is the catalogue file and basename is the name of the "output" that extracted files will go to. This command will create an iso image caled basename.iso

Enter the following comand: sudo mount -o loop basename.iso /mnt, this command will mount the iso file to /mnt

List the content using sudo ls /mnt
Read more
0

Mobile Phone Manager for Linux – Wammu

Wammu is a mobile phone manager that uses Gammu as its backend. It works with any phone that Gammu supports, including many models from Nokia, Sony-Ericssonn, Motorola, Samsung, Siemens, Huawei and others.

Feature:
* Read, edit, delete, copy for contacts, todo, and calendar.
* Read, save, and send SMS.
* SMS composer for multi-part SMS messages, and it can display SMS messages that include pictures.
* Search phone
* Backup

With all features above, i think Wammu can be an alternative for PC Suite-like application. Unfortunately, not all features above will work in any phone. You can find supported phone in Gammu’s Phone database. Find your phone in there before trying Wammu.

Install wammu - Phone manager:
Debian / Ubuntu: $ sudo apt-get install wammu
OpenSuSe 11.2 user can use "1-click" installer - here

After installation, go to terminal and type command wammu to open up the application


Click on "Next" to let wammu detect/configure you mobile phone.


Read more
0

Control Your Network badwidth with Wondershaper in Linux

If you are a Network Administrator with little knowledge in Network Protocols and IPtables, don't worry you can also controll your network traffic with a simple tool named wondershaper.

Installation:
OpenSuSe 11.2 user can use "1-click" installer to install Wondershaper - here
Ubuntu: sudo apt-get install wondershaper

$ifconfig this will help you to find the network interface (eth0, eth1 or wifi0 etc..) on which you need to apply bandwidth shaping.

Now here is the simple example of using wondershaper:
$sudo wondershaper eth0 downspeed upspeed

eg: sudo wonderspeed 128 64
To Disable this settings: $sudo wondershaper clear eth0

To make these connection settings permanent by editing /etc/network/interfaces file :
$ sudo gedit /etc/network/interfaces and add the following lines:
up /sbin/wondershaper eth0 downspeed upspeed
down /sbin/wondershaper clear eth0
Read more
7

How to Start/Stop & Disable Services in Ubuntu (Karmic Koala) Linux

Services are programs (called daemons) that once started run continuously in the background and are ready for input or a changes in your computer and respond to them. For example the Apache server has a daemon called httpd (the d is for daemon) that listens on port 80 on your computer and when it receives a request for a page it sends the appropriate data back to the client machine.

Many services are required to run all the time however many can be safely turned off for both security reasons as running unnecessary services opens more doors into your computer, but also for performance reasons. It may not make much difference but your computer should boot slightly faster the less services it has to start on boot.

This post explains how to start/stop the services and how to control which services start automatically at boot time for Ubuntu System

The scripts located in /etc/init.d are part of the bootup sequence of every Debian-like distro. Very often Ubuntu's documentation and guides have suggested - in order to deactivate init scripts - to change the permissions of the scripts in /etc/init.d, making them non-executable. This will have the following consequences:

    * You'll get an error message at boot time (to avoid it you need to patch all the scripts);
    * You are breaking the logical chain stated in debian-policy concerning runlevel configuration.

If the logic of a debian-like system boot up sequence is not very clear and familiar to you, you should not play with symlinks, permissions, etc. In order to avoid messing up your system, Boot-Up Manager will automate all of your configuration in a nice and clean graphical interface.

Installation:
Open up "Ubuntu Software Center" : Application >> Ubuntu Software Center and find for package "BootUp-Manager" and install it.


After successful installation go to : System >> Administration >> BootUp-Manager


Bootup-Manager got a very clean and simple interface through which you can start/stop or Disable the services in Ubuntu Linux System.
Read more
10

Nvidia and ATI Proprietary Graphics Drivers support in OpenSuSe 11.2 Linux

The problem of the proprietary (closed source) drivers is a very important subject in those 2006 days. The openSUSE decided to follow the kernels developers recommendations and not to include proprietary drivers with the kernel.

Please look at the linux-kernel mailing list to better understand the situation.

The reasons why a certain drivers is not included in the main openSUSE are the following:

    * The software is proprietary software, it does not conform to the Open Source definition.
    * The software is providing functionality which is patented and the patent holder is preventing distribution of the software.
    * The software violates laws concerning software distribution in jurisdictions where Novell conducts business.

Users who want to use this functionality despite this can follow this instruction to get the complete driver support in their OpenSuSe 11.2 Linux system.

NVIDIA Graphics Drivers:

The NVIDIA drivers cannot be integrated directly into openSUSE because of their license. Fortunately for new users, NVIDIA and openSUSE provide a very easy way to install NVIDIA drivers: NVIDIA makes RPMs for openSUSE and provides them in a repository.

Three classes of drivers support NVIDIA cards:

   1. The open source “nv” driver which has severe limitations (does not even support some new cards like the Quadro 570FX, does not have proper dual head support and has no 3D support) It is included in Xorg and is used by default.
   2. The closed source, proprietary “nvidia” driver which requires the “nvidia” kernel module which many kernel developers regard as being in violation of the GPL.
    3. There is the reverse engineered nouveau driver which is based on the nv driver. It aims to provide proper dual head support and 3D support.

So, in order to get the driver support, download the following file depending upon your card and execute them to let YAST install and configure the driver for you.

NVIDIA Current (GeForce 6xxx and newer) - Here
NVIDIA Legacy I (FX 5xxx) - Here
NVIDIA Legacy II (GeForce 4 and older) - Here

ATI Graphics Drivers:
Three classes of drivers support ATI cards:

   1. X.org includes F/LOSS drivers for many (older) ATI graphics adapters. These are used by default.
   2. The ATI graphics drivers are proprietary and many kernel developers consider this driver to violate the GPL license of the kernel.
   3. ATI has released some register specifications of their recent chipsets but has not released any documentation about the 3D functionality of their newer cards. The new ativivo and radeonhd drivers support (alpha quality) newer ATI R500/R600 graphics adapters. See the corresponding openSUSE news item

Please, consider that many older ATI cards are supported very well by the standard free driver radeon, which is installed during installation.

Before using the drivers below, try running your 3D application using the default open source drivers: radeon (for older cards) and radeonhd (for newer cards)

Use "1-click" installer to allow YAST to install and configure the required driver on your system

ATI Current - Here
ATI Legacy - Here
Read more
13

Multimedia (MP3, MPEG-4, AVI, DiVX, etc.) support in OpenSuse 11.2 Linux

Why doesn’t OpenSuSe support MP3 ‘out of the box’?

OpenSuSe cannot include support for MP3 or DVD video playback or recording. MP3 formats are patented, and the patent holders have not provided the necessary licenses. OpenSuSe also excludes other multimedia software due to patent, copyright, or license restrictions, such as Adobe Flash Player and RealNetworks RealPlayer.

That doesn’t mean you can’t play .mp3 files in OpenSuSe , it just takes a bit of work (not much).

Follow these instructions to get mp3 and other multimedia support on your OpenSuSe 11.2.

Use "1-click" installer to install all the required Codecs pack
If you are using KDE - Download and run (execute) this
If you are using Gnome - Download and execute this
To enable DVD playback - Download and execute this
This will enable you to have:
Flash
Java
Latest Amarok (with MP3 Support) for KDE, or Helix-Banshee for GNOME users
Encrypted DVD (libdvdcss)
Extra XINE Codecs, for DivX/Xvid etc. (libxine1)
K3b with MP3 Support (k3b-codecs)
Win 32 Codecs (w32codec-all)

Multimedia Players:
Mplayer - Download and run this file.
VLC Player - Download and run this file.

And after successful installation you should be able to play any media files.
Read more
0

Open Office 4 Kids - OOo4Kids

Openoffice.org for kids or better say OOo4kids is a project that aims to provide a simplified version of openoffice.org for kids between 7-12 years.

Ooo4Kids is based on OpenOffice.org source code. Everything is made with the idea to contribute back to OpenOffice.org Project, through OpenOffice.org Education Project, and students projects, but not only (all sort of contributions are welcome, of course). Resources are managed by the EducOOo non profit association.

The main difference between Open Office and Open Office 4 Kids are the missing features in Open Office 4 Kid. A benefit of this is the performance gain when working with Open Office 4 Kids compared to a default Open Office installation. The interface is different as well. Open Office 4 Kids makes use of less buttons in the interface and divides them into a header tool-bar and sidebar.Additional changes are planed by developers in future releases

OOo4kids is available for Linux ,Mac and Windows.The latest version of OOo4kids can be downloaded from this link : Here

Here is the video showing OOo4Kids Installation:


Read more
3

IP Filtering Program Similar to PeerGuardian for Linux - iplist

iplist is a Linux application for blocking connections to and from a specified range of hosts using the netfilter netlink-queue library. Iplist is an open source IP filtering program similar to PeerGuardian  for Linux.

Some typical reasons for using iplist are:
    * to protect your privacy
    * to ban a large number of unwanted clients
    * to block whole countries or networks
    * to block spam- and ad-servers
    * for parental control
    * network monitoring

Packets are filtered in the chains specified in IPTABLES_CHAIN_*. For each attempt to establish a new connection iplist looks at the source / destination address of the packet and decides based on the IPs in the lists whether to reject the connection (tcp-reset or icmp-port-unreachable) or to send it back to iptables to be handled by the rest of the iptables configuration. Packets in the INPUT chain are dropped by default. Nice side effects of rejecting packets rather than dropping are that there are no annoying timeouts if you try to access a blocked IP and it's hard to find out if the host which uses IPblock is online or uses a packet filter.

Installation:
OpenSuSe user can use "1-click" installer to install iplist - here

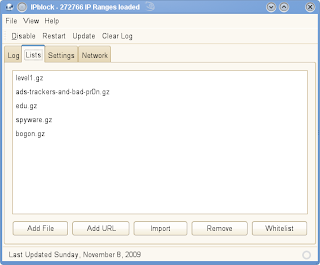
After the installation if you want to open ipblock go to Applications > System >  Internet > ipblock. Once it opens you should see similar to the following screen


The default choice for lists is similar to peerguardian.

    * level1.gz - Anti-P2P organizations and known government addresses
    * ads-trackers-and-bad-pr0n.gz - Advertising and data tracker servers
    * spyware.gz - Malicious spyware and adware servers
    * edu.gz - Educational institutions and universities
    * bogon.gz - Spoofed IP-addresses

Custom p2p or dat lists can easily be added. Note that lists can optionally be compressed with gzip.These lists are maintained here


There are many more setting that you can do in "setting" tab.
Read more
3

Installing Software from Ubuntu Software Center (Karmic Koala)

The Ubuntu Software Center is a virtual catalog of thousands of free   applications available for Ubuntu — software to make your computer more useful.  You can find applications by category or by searching, and you can install an application with the click of a button.
   
The Software Center also lets you examine the applications installed on the    computer already,and remove those you no longer need.

To install a program from the Software Center, you need administrator access and a working Internet connection. start the application from Application ⟶ Ubuntu Software Center


In the Get Free Software section, find the program you want to install. If you already know its name, try typing the name in the search field. Or try searching for the type of program you want (like “spreadsheet”). Otherwise, browse the Software Center departments to find the program.
             
  * Click the program in the list, and click the arrow button to go to the screen for the program.
             
  * Click the Install button. You may need to enter your Ubuntu password before the installation can begin.

  * How long a program takes to install depends on how large it is, and the speed of your computer and Internet connection.

While a program is being installed, it appears in the Software Center’s In Progress section. As soon as it disappears, the program is installed.
Read more
5

Time Synchronization on Ubuntu using NTP

Modern computers do have internal clocks called Real Time Clock chips (RTC) that provide time and date information. These chips are battery backed so that even during power outages, they can maintain time but personal computers are not designed to be perfect clocks. Their design has been optimized for mass production and low-cost rather than maintaining accurate time.

For many applications, this is can be quite adequate, although, quite often machines need time to be synchronised with other PC's on a network and when computers are out of sync with each other problems can arise such as sharing network files or in some environments even fraud!

NTP can maintain time over the public Internet to within 10 milliseconds (1/100th of a second) and can perform even better over LANs with accuracies of 200 microseconds (1/5000th of a second) under ideal conditions.

Keeping Linux systems synchronized is highly important for many reasons such as:

    * Security
    * Conducting time sensitive transactions
    * Tracing and logging errors
    * Preventing data loss
    * Auditing systems

To set up NTP time synchronization graphically, launch Time & Date, also available through (System ⟶ Administration ⟶ Time & Date). Click the keys to unlock settings. Now, you can select your time zone, and configure it to "Keep synchronized with Internet servers", at which point it will prompt you to Install NTP support.


After that, click "Select Servers" and check off the server closest to you.


Read more
1

How To Upgrade from Ubuntu 9.04 (Jaunty Jackalope) to Ubuntu 9.10 (Karmic Koala)

This tutorial provides instructions on upgrading to Ubuntu 9.10 (code name “Karmic Koala”), the most recent release of Ubuntu, released on the 29th of October 2009.

1. First and foremost, you need to backup all your important files.

2. Next, make sure the repository is updated: sudo apt-get update

3. Open the Update Manager with this command: sudo update-manager -d
If there are any updates to install, use the Install Updates button to install them, and press Check again after that is complete.

A message will appear informing you of the availability of the new release. 


The Update Manager will open and you will now see the upgrade option. If you are brave enough just go on. Follow the on-screen instructions.


4. Now sit back, relax and hope for the best.

If the upgrade process is successful and everything is working well, congratulations and have fun with Ubuntu 9.10 Karmic Koala.
Read more
0

Ubuntu 9.10 karmic koala quick Tour (Video)

As everybody knows that Ubuntu 9.10 Karmic koala has been released, bellow a quick video for the new features on ubuntu 9.10 karmic koala.


Ubuntu software center a quick view


Read more
5

How To Enable Multimedia (MP3, AVI, MPEG, Flash, etc ..) support in Ubuntu 9.10 (Karmic Koala)

Why doesn’t Ubuntu  support MP3 ‘out of the box’?
Ubuntu cannot include support for MP3 or DVD video playback or recording. MP3 formats are patented, and the patent holders have not provided the necessary licenses. Ubuntu also excludes other multimedia software due to patent, copyright, or license restrictions, such as Adobe Flash Player and RealNetworks RealPlayer.
That doesn’t mean you can’t play .mp3 and other media files in Ubuntu, it just takes a bit of work (not much). Follow these instructions to get mp3, AVI, Mpeg, Flash, etc .. and other multimedia support on your Ubuntu 9.10 (Karmic Koala).

In Ubuntu 9.10 "Karmic Koala", the universe, multiverse and restricted repositories are activated by default.

Run the following in terminal (Applications → Accessories → Terminal),  it will add medibuntu repositories in your sources list, It will also adds Medibuntu's GPG key to your keyring, which is needed to authenticate the Medibuntu packages.
$ sudo wget http://www.medibuntu.org/sources.list.d/karmic.list --output-document=/etc/apt/sources.list.d/medibuntu.list
$ sudo apt-get -q  update
$ sudo apt-get --yes -q --allow-unauthenticated install medibuntu-keyring
$ sudo apt-get -q  update
Now you can Install non-free-codecs, this will enables your system to support for MP3 and various other audio formats, unrar, Java runtime environment, Flash plugin, Microsoft fonts, w32codecs etc!
$ sudo apt-get install non-free-codecs
You can install more codecs and DVD Support by using following command, this will help you to run DVDs, AVI files and other mpeg codecs.
$ sudo apt-get install libdvdcss2 libxine1-ffmpeg gxine mencoder
Now Install some media players like VLC and Mplayer
$ sudo apt-get install vlc mplayer
You can also install some interesting and useful utilities like Audio Editing Software Audacity
$ sudo apt-get install audacity
Adobe Acrobat Reader
$sudo apt-get install acroread acroread-plugins
Read more
0

Booting Linux from Internet with boot.kernel.org

The main objective is to let users boot their machines with bare minimal requirements on their side, and boot.kernel.org will handle most of the problem that user may face in booting. All that user needs is Internet connectivity and a small program (gpxe) to boot the machine. This gpxe program provides network booting facility. You can download these program from site (available at Downloads section).

Warning: Backup your important data before using USB

Make a bootable USB:
* Linux: Insert a USB disk, find it's device name of USB. Then use following command:

cat gpxe.dsk > /dev/sdX or dd if=gpxe.dsk of=/dev/sdX

where sdX is your usb drive.

* Windows:You can use dd for windows for Creating bootable USB disks.
* Mac: the dd command mentioned above for linux should also work for MAC.

Steps to follow:
* Boot from the media in which you had copied the gpxe Image.
* In case of Static networking, you need to provide information about your connection, but if you are having DHCP, it should work out of the box.
* You will be presented with menu showing available options to boot from, select one of them.
* Your system should boot in the sytem you select.
* Once you are done with it, reboot the system and remvoe the media, you should get back your old system.  
 

Read more
0

How To Make DVD Video disc capable of playing on a DVD player (DVD Authoring)

Bombono DVD is easy to use program for making DVD video discs. This program allows you to get video on optical discs without knowing many technical details. It provides the full authoring sequence: making chapters while browsing videos, custom menu creation, authoring, and optionally burning on DVD. Also, it features the interesting feature of re-authoring, which allows one to get video back from DVDs.

The main features of Bombono DVD are:
    * Excellent MPEG viewer: Timeline and Monitor
    * Real WYSIWYG Menu Editor with live thumbnails
    * Comfortable Drag-n-Drop support
    * You can author to folder, make ISO-image or burn directly to DVD
    * Reauthoring: you can import video from DVD discs.

Bombono DVD is Open Source software and freely distributed under GPL license.

Installation (Ubuntu):
On your Ubuntu computer, open System >  Administration >  Synaptic Package Manager. Then choose from menu Settings >  Repositories and click the Third Party Software tab.

software-sources-3rdparty-tab.png

Click the Add button. Copy and paste the following line.

For Hardy:    deb http://ppa.launchpad.net/muravjov-il/ppa/ubuntu hardy main

For Intrepid: deb http://ppa.launchpad.net/muravjov-il/ppa/ubuntu intrepid main

For Jauntydeb http://ppa.launchpad.net/muravjov-il/ppa/ubuntu jaunty main


Click the Add Source button and close the dialog. Now you are noticed that repositories changed, so click the Reload button. Don't worry if you see a warning about unverified signatures and unauthenticated software; we'll fix that later.

Now you can install Bombono DVD as other software in Synaptic. For example, click the Origin button and choose.

Launching Bombono DVD
To launch Bombono DVD, just open Applications > Sound & Video > Bombono DVD.


Click here for the detail documentation on how to create a DVD disc

Telling Ubuntu how to authenticate the repository
Bombono Repository has GPG signing key BBAB22E8. Open your terminal and enter:

sudo apt-key adv --keyserver keyserver.ubuntu.com --recv-keys BBAB22E8
sudo apt-get update

Now you don't have any warnings about software can't be authenticated

Installation (OpenSuSe):
OpenSuSe user can use "1-click" installer to install Bombono DVD - here
Read more
Related Posts with Thumbnails